Istio安装
了解Istio的基本概念和基本的理论,使用Centos搭建的Kubernetes集群部署Istio服务网格
Istio安装
使用Istioctl安装
1.拉取Istio的安装包
$ curl -O http://192.168.1.110/file/istio-1.9.5-linux-amd64.tar.gz

$ ls
istio-1.9.5-linux-amd64.tar.gz
$ tar -zxvf istio-1.9.5-linux-amd64.tar.gz
2.复制istioctl工具
$ cd istio-1.9.5/
$ cp bin/istioctl  /usr/local/bin/
3.使用默认配置文件安装 Istio
最简单的选择是 使用以下命令安装defaultIstio 配置文件:
$ istioctl install
4.安装不同的配置文件
通过在命令行上传递配置文件名称,可以将其他 Istio 配置文件安装到集群中。例如,以下命令可用于安装demo配置文件:
$ kubectl  create  ns istio-system
$ istioctl install --set profile=demo -y
✔ Istio core installed
✔ Istiod installed
✔ Egress gateways installed
✔ Ingress gateways installed
✔ Installation complete
5.检查安装了什么
该istioctl命令将IstioOperator用于安装 Istio的CR保存在名为installed-state. 而不是检查 Istio 安装的部署、pod、服务和其他资源,例如:
$ kubectl -n istio-system get deploy
NAME                   READY   UP-TO-DATE   AVAILABLE   AGE
istio-egressgateway    1/1     1            1           25s
istio-ingressgateway   1/1     1            1           24s
istiod                 1/1     1            1           20s
6.注入默认变量
将目录更改为 Istio 安装的根目录。
默认的 Istio 安装使用自动边车注入。标记将托管应用程序的命名空间istio-injection=enabled:
$ kubectl label namespace default istio-injection=enabled
卸载 Istio
要从集群中完全卸载 Istio,请运行以下命令:
$ istioctl x uninstall --purge
可选--purge标志将删除所有 Istio 资源,包括可能与其他 Istio 控制平面共享的集群范围的资源。
测试一个实例
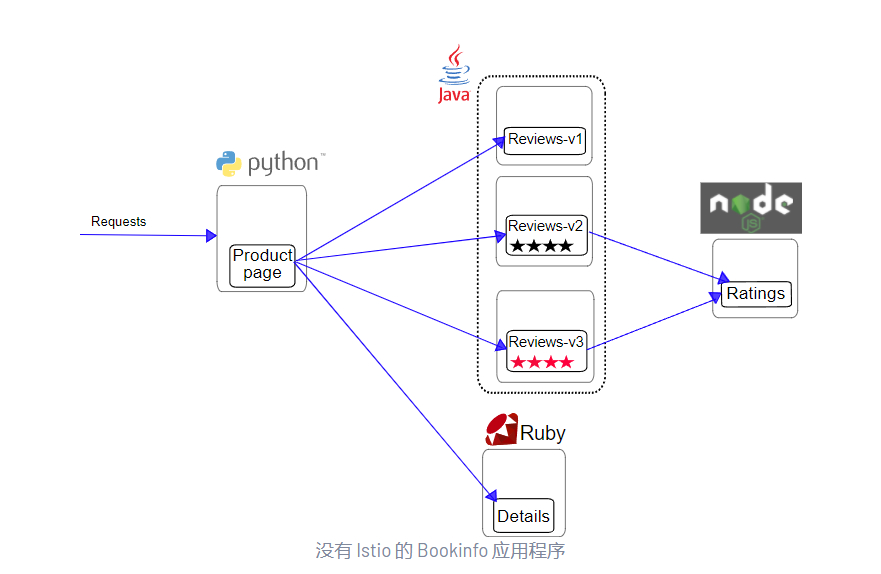
Bookinfo
Bookinfo 应用程序分为四个独立的微服务:
productpage. 该productpage微服务调用details和reviews微服务来填充页面。details. 该details微服务包含图书信息。reviews. 该reviews微服务包含了书评。它还调用ratings微服务。ratings. 该ratings微服务包含预定伴随书评排名信息。
reviews微服务有 3 个版本:
- 版本 v1 不调用该
ratings服务。 - 版本 v2 调用该
ratings服务,并将每个评级显示为 1 到 5 颗黑星。 - 版本 v3 调用该
ratings服务,并将每个评级显示为 1 到 5 颗红星。
该应用程序的端到端架构如下所示。
使用Istio部署应用程序
使用 Istio 运行示例不需要更改应用程序本身。相反,您只需要在支持 Istio 的环境中配置和运行服务,并在每个服务旁边注入 Envoy sidecar。生成的部署将如下所示:

启动应用服务🚀
使用以下kubectl命令部署您的应用程序:
$ kubectl apply -f samples/bookinfo/platform/kube/bookinfo.yaml
查看所有服务🚀
[root@master istio-1.9.5]# kubectl get svc
NAME          TYPE        CLUSTER-IP       EXTERNAL-IP   PORT(S)    AGE
details       ClusterIP   10.104.17.202    <none>        9080/TCP   21m
kubernetes    ClusterIP   10.96.0.1        <none>        443/TCP    41m
productpage   ClusterIP   10.110.235.179   <none>        9080/TCP   21m
ratings       ClusterIP   10.104.53.51     <none>        9080/TCP   21m
reviews       ClusterIP   10.101.21.63     <none>        9080/TCP   21m

[root@master istio-1.9.5]# kubectl get pods
NAME                              READY   STATUS    RESTARTS   AGE
details-v1-79f774bdb9-gwhkf       2/2     Running   0          21m
productpage-v1-6b746f74dc-6dtg8   2/2     Running   0          21m
ratings-v1-b6994bb9-9h2wn         2/2     Running   0          21m
reviews-v1-545db77b95-6cmmv       2/2     Running   0          21m
reviews-v2-7bf8c9648f-m2k9d       2/2     Running   0          21m
reviews-v3-84779c7bbc-vd86b       2/2     Running   0          21m
通过Curl请求测试🚀
要确认 Bookinfo 应用程序正在运行,请通过curl来自某个 pod的命令向其发送请求,例如来自ratings:
[root@master istio-1.9.5]# kubectl exec "$(kubectl get pod -l app=ratings -o jsonpath='{.items[0].metadata.name}')" -c ratings -- curl -sS productpage:9080/productpage | grep -o "<title>.*</title>"
<title>Simple Bookstore App</title>
确定入口IP和端口🚀
现在 Bookinfo 服务已启动并运行,您需要使应用程序可从 Kubernetes 集群外部访问,例如从浏览器访问。一个Istio网关 用于此目的。
为应用定义入口网关
[root@master istio-1.9.5]# kubectl apply -f samples/bookinfo/networking/bookinfo-gateway.yaml
gateway.networking.istio.io/bookinfo-gateway created
virtualservice.networking.istio.io/bookinfo created
确认网关已创建
[root@master istio-1.9.5]# kubectl get gateway
NAME               AGE
bookinfo-gateway   61s
改为NodePort
此处我们并没有外部负载,所以要将svc修改成NodePort的方式。
[root@master istio-1.9.5]# kubectl get svc -n istio-system
NAME                   TYPE         CLUSTER-IP      EXTERNAL-IP   PORT(S)                                                                      AGE
istio-egressgateway    ClusterIP    10.102.197.30   <none>        80/TCP,443/TCP,15443/TCP                                                     89m
istio-ingressgateway   LoadBalancer 10.109.71.35    <none>        15021:31964/TCP,80:31467/TCP,443:31845/TCP,31400:31077/TCP,15443:30757/TCP   89m
istiod                 ClusterIP    10.111.156.86   <none>        15010/TCP,15012/TCP,443/TCP,15014/TCP                                        90m

#访问masterIP+80端口对应暴露的31962
注意: 如果 EXTERNAL-IP 设置了该值,则要求您的环境具有可用于 Ingress 网关的外部负载均衡器。如果 EXTERNAL-IP 值是 <none>(或一直是 <pending> ),则说明可能您的环境不支持为 ingress 网关提供外部负载均衡器的功能。在这种情况下,您可以使用 Service 的 node port 方式访问网关。
使用 kubectl patch 更新 istio-ingressgateway 服务网关类型
[root@master istio-1.9.5]# kubectl patch service istio-ingressgateway -n istio-system -p '{"spec":{"type":"NodePort"}}'
设置入口端口
$ export INGRESS_PORT=$(kubectl -n istio-system get service istio-ingressgateway -o jsonpath='{.spec.ports[?(@.name=="http2")].nodePort}')
$ export SECURE_INGRESS_PORT=$(kubectl -n istio-system get service istio-ingressgateway -o jsonpath='{.spec.ports[?(@.name=="https")].nodePort}')
$ export TCP_INGRESS_PORT=$(kubectl -n istio-system get service istio-ingressgateway -o jsonpath='{.spec.ports[?(@.name=="tcp")].nodePort}')
获取ingress ip地址
$ export INGRESS_HOST=$(kubectl get po -l istio=ingressgateway -n istio-system -o jsonpath='{.items[0].status.hostIP}')

应用默认目标规则🚀
在使用 Istio 控制 Bookinfo 版本路由之前,您需要在目标规则中定义可用版本,称为子集。
运行以下命令为 Bookinfo 服务创建默认目标规则:
$ kubectl apply -f samples/bookinfo/networking/destination-rule-all.yaml
在
default与demo配置轮廓具有自动相互TLS启用默认情况下。要强制实施双向 TLS,请使用samples/bookinfo/networking/destination-rule-all-mtls.yaml.
清理🚀
当您完成 Bookinfo 示例的试验后,请按照以下说明卸载并清理它:
删除路由规则并终止应用程序 Pod
$ samples/bookinfo/platform/kube/cleanup.sh
确认关机
$ kubectl get virtualservices   #-- there should be no virtual services
$ kubectl get destinationrules  #-- there should be no destination rules
$ kubectl get gateway           #-- there should be no gateway
$ kubectl get pods              #-- the Bookinfo pods should be deleted
ces
$ kubectl get destinationrules  #-- there should be no destination rules
$ kubectl get gateway           #-- there should be no gateway
$ kubectl get pods              #-- the Bookinfo pods should be deleted

开源、云原生的融合云平台
更多推荐
 2
2 0
0- 0


 已为社区贡献1条内容

所有评论(0)