k8s安装卸载、Dashboard、KubeSphere、资源管理、Pod、Service、Ingress、K8s持久化配置、存储配置、K8s部署项目
资料:
链接:https://pan.baidu.com/s/10Kn1lIMPaVNRP9o9UdORmA
提取码:yyds
文章目录
K8s安装
理解!
kube-proxy–>网络代理kubelet–>厂长,由他创建集群api-server–>统一入口controller-manage–>控制管理etcd–>文件库schedluer–>节点调度器coredns–>核心dnspause–>Pod的根容器flannel -->网络插件
1. 安装要求(一定要满足!!),所有节点
在开始之前,部署Kubernetes集群机器需要满足以下几个条件:
- 一台或多台机器,操作系统 CentOS7.x-86_x64
- 硬件配置:2GB或更多RAM,2个CPU或更多CPU,硬盘30GB或更多
- 可以访问外网,需要拉取镜像,如果服务器不能上网,需要提前下载镜像并导入节点
- 禁止swap分区
2. 准备环境,所有节点
| 角色 | IP |
|---|---|
| master | 192.168.111.101 |
| node | 192.168.111.102 |
# 关闭防火墙
systemctl stop firewalld
systemctl disable firewalld

# 关闭selinux
sed -i 's/enforcing/disabled/' /etc/selinux/config  # 永久
setenforce 0  # 临时

# 关闭swap
swapoff -a  # 临时
sed -ri 's/.*swap.*/#&/' /etc/fstab    # 永久

# 根据规划设置主机名
hostnamectl set-hostname <hostname>

hostname 命令查看主机名
# 添加hosts!!!
cat >> /etc/hosts << EOF
192.168.111.101 master
192.168.111.102 node
EOF

# 将桥接的IPv4流量传递到iptables的链
cat > /etc/sysctl.d/k8s.conf << EOF
net.bridge.bridge-nf-call-ip6tables = 1
net.bridge.bridge-nf-call-iptables = 1
EOF
sysctl --system  # 生效

# 时间同步
yum install ntpdate -y
ntpdate time.windows.com
3. 所有节点安装Docker/kubeadm/kubelet
Kubernetes默认CRI(容器运行时)为Docker,因此先安装Docker。
- 安装Docker
sudo yum remove docker*
sudo yum install -y yum-utils

#配置docker的yum地址
sudo yum-config-manager \
--add-repo \
http://mirrors.aliyun.com/docker-ce/linux/centos/docker-ce.repo

#安装指定版本
sudo yum install -y docker-ce-20.10.7 docker-ce-cli-20.10.7 containerd.io-1.4.6

#	启动&开机启动docker
systemctl enable docker --now

# docker加速配置
sudo mkdir -p /etc/docker
sudo tee /etc/docker/daemon.json <<-'EOF'
{
   "registry-mirrors": ["https://441nlr92.mirror.aliyuncs.com"],
  "exec-opts": ["native.cgroupdriver=systemd"],
  "log-driver": "json-file",
  "log-opts": {
    "max-size": "100m"
  },
  "storage-driver": "overlay2"
}
EOF

sudo systemctl daemon-reload
sudo systemctl restart docker

docker --version
# Docker version 20.10.7, build f0df350
- 安装kubeadm,kubelet和kubectl
由于版本更新频繁,这里指定版本号部署:
#配置k8s的yum源地址
cat <<EOF | sudo tee /etc/yum.repos.d/kubernetes.repo
[kubernetes]
name=Kubernetes
baseurl=http://mirrors.aliyun.com/kubernetes/yum/repos/kubernetes-el7-x86_64
enabled=1
gpgcheck=0
repo_gpgcheck=0
gpgkey=http://mirrors.aliyun.com/kubernetes/yum/doc/yum-key.gpg
   http://mirrors.aliyun.com/kubernetes/yum/doc/rpm-package-key.gpg
EOF

sudo yum install -y kubelet-1.20.9 kubeadm-1.20.9 kubectl-1.20.9
#启动kubelet
sudo systemctl enable kubelet --now

systemctl status kubelet
# 查看状态, 主节点kubeadm init初始化之后kubelet 成功启动!
# 从节点  ,kubeadm join加入集群之后kubelet 成功启动!
4.清除之前部署的网络,所有节点
ifconfig

用
删除重生的方法,首先停用网络,然后删除配置
ifconfig cni0 down
ip link delete cni0

#这是pod的ip地址
ifconfig flannel.1 down
ip link delete flannel.1
5. 部署Kubernetes Master
在 192.168.111.101(Master)执行
 kubeadm init \
--apiserver-advertise-address=192.168.111.101 \
--image-repository registry.aliyuncs.com/google_containers \
--kubernetes-version v1.20.15 \
--service-cidr=10.96.0.0/16 \
--pod-network-cidr=10.244.0.0/16

#  要保证各个网段 不一样
#	使用 kubeadm init时,请指定pod-network-cidr。确保 主机/主网络的ip 不在你引用的子网中!!!
#	即如果你的网络运行在192.168..使用10.0.0.0/16
#	如果你的网络是10.0..使用192.168.0.0/16

使用kubectl(master)工具:
rm -rf $HOME/.kube
mkdir -p $HOME/.kube
sudo cp -i /etc/kubernetes/admin.conf $HOME/.kube/config
sudo chown $(id -u):$(id -g) $HOME/.kube/config
kubectl get nodes #查看节点
docker images查看镜像
八个镜像一个都不能少,下面还需要网络插件!
registry.aliyuncs.com/google_containers/kube-proxy                v1.20.15   46e2cd1b2594   8 months ago    99.7MB
registry.aliyuncs.com/google_containers/kube-apiserver            v1.20.15   323f6347f5e2   8 months ago    122MB
registry.aliyuncs.com/google_containers/kube-controller-manager   v1.20.15   d6296d0e06d2   8 months ago    116MB
registry.aliyuncs.com/google_containers/kube-scheduler            v1.20.15   9155e4deabb3   8 months ago    47.3MB
quay.io/coreos/flannel                                            v0.15.1    e6ea68648f0c   10 months ago   69.5MB
registry.aliyuncs.com/google_containers/etcd                      3.4.13-0   0369cf4303ff   2 years ago     253MB
registry.aliyuncs.com/google_containers/coredns                   1.7.0      bfe3a36ebd25   2 years ago     45.2MB
registry.aliyuncs.com/google_containers/pause                     3.2        80d28bedfe5d   2 years ago     683kB
不行的话,就手动拉取
docker pull,kubeadm reset重置后再kubeadm init
链接:https://pan.baidu.com/s/1uu06EGckeXX0REvX_xqBvA
提取码:yyds
网络插件镜像:quay.io/coreos/flannel:v0.15.1镜像
quay.io/coreos/flannel版本需要和kube-flannel.yml中的一致!

docker load -i flannel.tar #即可获取镜像
6. 加入Kubernetes Node
在192.168.111.102/13(Node)执行

向集群
添加新节点,执行在kubeadm init输出的kubeadm join命令:
kubeadm join 192.168.111.101:6443 --token 3xtclw.c29as49tg9mp7259 \
    --discovery-token-ca-cert-hash sha256:e026d26b0d3d0f1d0c90ea63eb9c5fa01fdd189b07377463ca981a99644c13bc

加入成功!有
报错的话看Error信息,对应处理即可!
默认token有效期为24小时,当过期之后,该token就不可用了。这时就需要重新创建token,操作如下:
kubeadm token create --print-join-command
子节点
必须有这三个镜像

查看节点 kubectl get nodes
必须都是Ready状态!

7. 部署CNI网络插件,Master节点
wget https://raw.githubusercontent.com/coreos/flannel/master/Documentation/kube-flannel.yml

#不行换下面的方式
---
apiVersion: policy/v1beta1
kind: PodSecurityPolicy
metadata:
name: psp.flannel.unprivileged
annotations:
seccomp.security.alpha.kubernetes.io/allowedProfileNames: docker/default
seccomp.security.alpha.kubernetes.io/defaultProfileName: docker/default
apparmor.security.beta.kubernetes.io/allowedProfileNames: runtime/default
apparmor.security.beta.kubernetes.io/defaultProfileName: runtime/default
spec:
privileged: false
volumes:
- configMap
- secret
- emptyDir
- hostPath
allowedHostPaths:
- pathPrefix: "/etc/cni/net.d"
- pathPrefix: "/etc/kube-flannel"
- pathPrefix: "/run/flannel"
readOnlyRootFilesystem: false
# Users and groups
runAsUser:
rule: RunAsAny
supplementalGroups:
rule: RunAsAny
fsGroup:
rule: RunAsAny
# Privilege Escalation
allowPrivilegeEscalation: false
defaultAllowPrivilegeEscalation: false
# Capabilities
allowedCapabilities: ['NET_ADMIN', 'NET_RAW']
defaultAddCapabilities: []
requiredDropCapabilities: []
# Host namespaces
hostPID: false
hostIPC: false
hostNetwork: true
hostPorts:
- min: 0
max: 65535
# SELinux
seLinux:
# SELinux is unused in CaaSP
rule: 'RunAsAny'
---
kind: ClusterRole
apiVersion: rbac.authorization.k8s.io/v1
metadata:
name: flannel
rules:
- apiGroups: ['extensions']
resources: ['podsecuritypolicies']
verbs: ['use']
resourceNames: ['psp.flannel.unprivileged']
- apiGroups:
- ""
resources:
- pods
verbs:
- get
- apiGroups:
- ""
resources:
- nodes
verbs:
- list
- watch
- apiGroups:
- ""
resources:
- nodes/status
verbs:
- patch
---
kind: ClusterRoleBinding
apiVersion: rbac.authorization.k8s.io/v1
metadata:
name: flannel
roleRef:
apiGroup: rbac.authorization.k8s.io
kind: ClusterRole
name: flannel
subjects:
- kind: ServiceAccount
name: flannel
namespace: kube-system
---
apiVersion: v1
kind: ServiceAccount
metadata:
name: flannel
namespace: kube-system
---
kind: ConfigMap
apiVersion: v1
metadata:
name: kube-flannel-cfg
namespace: kube-system
labels:
tier: node
app: flannel
data:
cni-conf.json: |
{
"name": "cbr0",
"cniVersion": "0.3.1",
"plugins": [
{
"type": "flannel",
"delegate": {
"hairpinMode": true,
"isDefaultGateway": true
}
},
{
"type": "portmap",
"capabilities": {
"portMappings": true
}
}
]
}
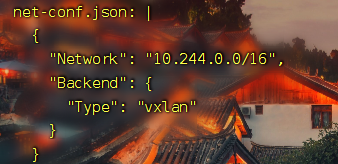
net-conf.json: |
{
"Network": "10.244.0.0/16",
"Backend": {
"Type": "vxlan"
}
}
---
apiVersion: apps/v1
kind: DaemonSet
metadata:
name: kube-flannel-ds
namespace: kube-system
labels:
tier: node
app: flannel
spec:
selector:
matchLabels:
app: flannel
template:
metadata:
labels:
tier: node
app: flannel
spec:
affinity:
nodeAffinity:
requiredDuringSchedulingIgnoredDuringExecution:
nodeSelectorTerms:
- matchExpressions:
- key: kubernetes.io/os
operator: In
values:
- linux
hostNetwork: true
priorityClassName: system-node-critical
tolerations:
- operator: Exists
effect: NoSchedule
serviceAccountName: flannel
initContainers:
- name: install-cni
image: quay.io/coreos/flannel:v0.15.1
command:
- cp
args:
- -f
- /etc/kube-flannel/cni-conf.json
- /etc/cni/net.d/10-flannel.conflist
volumeMounts:
- name: cni
mountPath: /etc/cni/net.d
- name: flannel-cfg
mountPath: /etc/kube-flannel/
containers:
- name: kube-flannel
image: quay.io/coreos/flannel:v0.15.1
command:
- /opt/bin/flanneld
args:
- --ip-masq
- --kube-subnet-mgr
resources:
requests:
cpu: "100m"
memory: "50Mi"
limits:
cpu: "100m"
memory: "50Mi"
securityContext:
privileged: false
capabilities:
add: ["NET_ADMIN", "NET_RAW"]
env:
- name: POD_NAME
valueFrom:
fieldRef:
fieldPath: metadata.name
- name: POD_NAMESPACE
valueFrom:
fieldRef:
fieldPath: metadata.namespace
volumeMounts:
- name: run
mountPath: /run/flannel
- name: flannel-cfg
mountPath: /etc/kube-flannel/
volumes:
- name: run
hostPath:
path: /run/flannel
- name: cni
hostPath:
path: /etc/cni/net.d
- name: flannel-cfg
configMap:
name: kube-flannel-cfg
kube-flannel.yml 为该yml的文件名
#运行命令,加载该文件
kubectl apply -f kube-flannel.yml
#查看状态
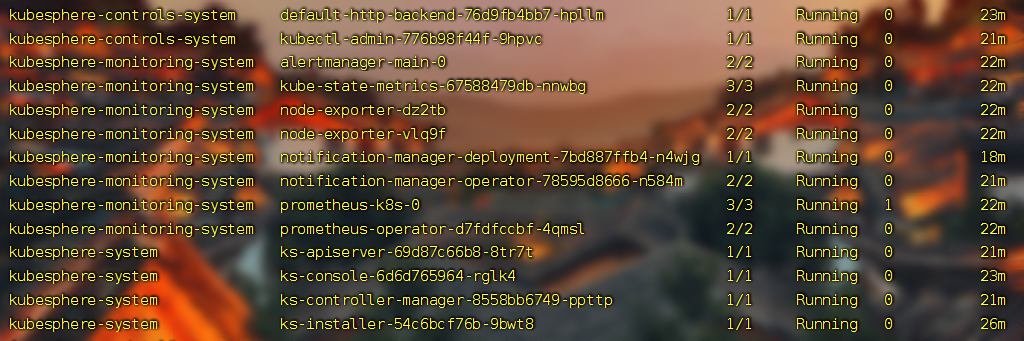
kubectl get pods -n kube-system

8. 测试kubernetes集群
在Kubernetes集群中创建一个pod,验证是否正常运行:
kubectl create deployment nginx --image=nginx
kubectl expose deployment nginx --port=80 --type=NodePort
kubectl get pod,svc
访问地址:http://NodeIP:Port
9.错误
- curl -sSL http://localhost:10248/healthz connect: connection refused
The HTTP call equal to 'curl -sSL http://localhost:10248/healthz' failed with error: Get http://localhost:10248/healthz: dial tcp [::1]:10248: connect: connection refused

:::rm -rf $HOME/.kube
首先需要到 k8smaster1 节点,创建一个文件
# 创建文件夹
mkdir /etc/systemd/system/kubelet.service.d

# 创建文件
vim /etc/systemd/system/kubelet.service.d/10-kubeadm.conf

# 添加如下内容
Environment="KUBELET_SYSTEM_PODS_ARGS=--pod-manifest-path=/etc/kubernetes/manifests --allow-privileged=true --fail-swap-on=false"

# 重置
kubeadm reset
然后删除刚刚创建的配置目录
rm -rf $HOME/.kube
在 k8smaster1 重新初始化
kubeadm init --apiserver-advertise-address=92.168.60.151:6443 --image-repository registry.aliyuncs.com/google_containers --kubernetes-version v1.18.0 --service-cidr=10.96.0.0/12  --pod-network-cidr=10.244.0.0/16
:::
- kubectl get nodes 出现问题Unable to connect to the server
Unable to connect to the server:  #删除目录后重建
:::解决方法
rm -rf $HOME/.kube
然后再次创建一下即可
mkdir -p $HOME/.kube
sudo cp -i /etc/kubernetes/admin.conf $HOME/.kube/config
sudo chown $(id -u):$(id -g) $HOME/.kube/config
这个问题主要是因为我们在执行 kubeadm reset 的时候,没有把 $HOME/.kube 给移除掉,再次创建时就会出现问题了
:::
- kubeadm join添加 k8snode1 节点到集群[ERROR FileAvailable–etc-kubernetes-pki-ca.crt]
[root@k8smaster1 ~]# kubeadm join 192.168.60.151:6443 --token jkcz0t.3c40t0bqqz5g8wsb     --discovery-token-ca-cert-hash sha256:bc494eeab6b7bac64c0861da16084504626e5a95ba7ede7b9c2dc7571ca4c9e5

[ERROR FileContent--proc-sys-net-ipv4-ip_forward]: /proc/sys/net/ipv4/ip_forward contents are not set to 1 #设为1即可
[ERROR FileAvailable--etc-kubernetes-pki-ca.crt]: /etc/kubernetes/pki/ca.crt already exists #文件存在,删除即可
:::解决方法
echo “1” > /proc/sys/net/ipv4/ip_forward
rm -rf /etc/kubernetes/pki/ca.crt
:::
- docker 版本问题
this Docker version is not on the list of validated versions: 20.10.17. Latest validated version: 19

docker 版本问题
1.卸载docker服务
systemctl stop docker
yum remove docker-ce docker-ce-cli containerd.io
rm -rf /var/lib/docker
rm -rf /var/lib/containerd
2.重新下载docker服务
# 指定docker版本
yum install docker-ce-18.06.1.ce-3.el7 docker-ce-cli-18.06.1.ce-3.el7 containerd.io docker-compose-plugin
# docker官网指定格式
yum install docker-ce-<VERSION_STRING> docker-ce-cli-<VERSION_STRING> containerd.io docker-compose-plugin
- coredns- 0/1,状态为Running

过一会再查看
kubectl get po -A
#	使用 kubeadm init时,请指定pod-network-cidr。确保 主机/主网络的ip 不在你引用的子网中!!!
#	即如果你的网络运行在192.168..使用10.0.0.0/16
#	如果你的网络是10.0..使用192.168.0.0/16
- “cni0” already has an IP address different from 10.244.1.1/24

用
删除重生的方法,首先停用网络,然后删除配置
ifconfig cni0 down
ip link delete cni0
#这是pod的ip地址
ifconfig flannel.1 down
ip link delete flannel.1
kubeadm reset重置后再kubeadm init
卸载K8s
- 执行kubeadm reset命令
清空K8s集群设置卸载管理组件
systemctl stop kubelet.service  # 停掉kubelet
kubeadm reset
# 输入y
# 不行就多试几次
- 卸载管理组件
yum erase -y kubelet kubectl kubeadm kubernetes-cni
- docker全部清理
docker rm $(docker ps -a -q)

docker rmi $(docker images -q)
- docker 重启
systemctl daemon-reload

systemctl restart docker

systemctl stop docker service
K8s的Dashboard
- recommended.yaml文件
apiVersion: v1
kind: Namespace
metadata:
  name: kubernetes-dashboard

---

apiVersion: v1
kind: ServiceAccount
metadata:
  labels:
    k8s-app: kubernetes-dashboard
  name: kubernetes-dashboard
  namespace: kubernetes-dashboard

---

kind: Service
apiVersion: v1
metadata:
  labels:
    k8s-app: kubernetes-dashboard
  name: kubernetes-dashboard
  namespace: kubernetes-dashboard
spec:
  ports:
    - port: 443
      targetPort: 8443
      nodePort: 30009 #新增
  selector:
    k8s-app: kubernetes-dashboard
  type: NodePort #新增
---

apiVersion: v1
kind: Secret
metadata:
  labels:
    k8s-app: kubernetes-dashboard
  name: kubernetes-dashboard-certs
  namespace: kubernetes-dashboard
type: Opaque

---

apiVersion: v1
kind: Secret
metadata:
  labels:
    k8s-app: kubernetes-dashboard
  name: kubernetes-dashboard-csrf
  namespace: kubernetes-dashboard
type: Opaque
data:
  csrf: ""

---

apiVersion: v1
kind: Secret
metadata:
  labels:
    k8s-app: kubernetes-dashboard
  name: kubernetes-dashboard-key-holder
  namespace: kubernetes-dashboard
type: Opaque

---

kind: ConfigMap
apiVersion: v1
metadata:
  labels:
    k8s-app: kubernetes-dashboard
  name: kubernetes-dashboard-settings
  namespace: kubernetes-dashboard

---

kind: Role
apiVersion: rbac.authorization.k8s.io/v1
metadata:
  labels:
    k8s-app: kubernetes-dashboard
  name: kubernetes-dashboard
  namespace: kubernetes-dashboard
rules:
  # Allow Dashboard to get, update and delete Dashboard exclusive secrets.
  - apiGroups: [""]
    resources: ["secrets"]
    resourceNames: ["kubernetes-dashboard-key-holder", "kubernetes-dashboard-certs", "kubernetes-dashboard-csrf"]
    verbs: ["get", "update", "delete"]
    # Allow Dashboard to get and update 'kubernetes-dashboard-settings' config map.
  - apiGroups: [""]
    resources: ["configmaps"]
    resourceNames: ["kubernetes-dashboard-settings"]
    verbs: ["get", "update"]
    # Allow Dashboard to get metrics.
  - apiGroups: [""]
    resources: ["services"]
    resourceNames: ["heapster", "dashboard-metrics-scraper"]
    verbs: ["proxy"]
  - apiGroups: [""]
    resources: ["services/proxy"]
    resourceNames: ["heapster", "http:heapster:", "https:heapster:", "dashboard-metrics-scraper", "http:dashboard-metrics-scraper"]
    verbs: ["get"]

---

kind: ClusterRole
apiVersion: rbac.authorization.k8s.io/v1
metadata:
  labels:
    k8s-app: kubernetes-dashboard
  name: kubernetes-dashboard
rules:
  # Allow Metrics Scraper to get metrics from the Metrics server
  - apiGroups: ["metrics.k8s.io"]
    resources: ["pods", "nodes"]
    verbs: ["get", "list", "watch"]

---

apiVersion: rbac.authorization.k8s.io/v1
kind: RoleBinding
metadata:
  labels:
    k8s-app: kubernetes-dashboard
  name: kubernetes-dashboard
  namespace: kubernetes-dashboard
roleRef:
  apiGroup: rbac.authorization.k8s.io
  kind: Role
  name: kubernetes-dashboard
subjects:
  - kind: ServiceAccount
    name: kubernetes-dashboard
    namespace: kubernetes-dashboard

---

apiVersion: rbac.authorization.k8s.io/v1
kind: ClusterRoleBinding
metadata:
  name: kubernetes-dashboard
roleRef:
  apiGroup: rbac.authorization.k8s.io
  kind: ClusterRole
  name: kubernetes-dashboard
subjects:
  - kind: ServiceAccount
    name: kubernetes-dashboard
    namespace: kubernetes-dashboard

---

kind: Deployment
apiVersion: apps/v1
metadata:
  labels:
    k8s-app: kubernetes-dashboard
  name: kubernetes-dashboard
  namespace: kubernetes-dashboard
spec:
  replicas: 1
  revisionHistoryLimit: 10
  selector:
    matchLabels:
      k8s-app: kubernetes-dashboard
  template:
    metadata:
      labels:
        k8s-app: kubernetes-dashboard
    spec:
      containers:
        - name: kubernetes-dashboard
          image: kubernetesui/dashboard:v2.3.1
          imagePullPolicy: Always
          ports:
            - containerPort: 8443
              protocol: TCP
          args:
            - --auto-generate-certificates
            - --namespace=kubernetes-dashboard
            # Uncomment the following line to manually specify Kubernetes API server Host
            # If not specified, Dashboard will attempt to auto discover the API server and connect
            # to it. Uncomment only if the default does not work.
            # - --apiserver-host=http://my-address:port
          volumeMounts:
            - name: kubernetes-dashboard-certs
              mountPath: /certs
              # Create on-disk volume to store exec logs
            - mountPath: /tmp
              name: tmp-volume
          livenessProbe:
            httpGet:
              scheme: HTTPS
              path: /
              port: 8443
            initialDelaySeconds: 30
            timeoutSeconds: 30
          securityContext:
            allowPrivilegeEscalation: false
            readOnlyRootFilesystem: true
            runAsUser: 1001
            runAsGroup: 2001
      volumes:
        - name: kubernetes-dashboard-certs
          secret:
            secretName: kubernetes-dashboard-certs
        - name: tmp-volume
          emptyDir: {}
      serviceAccountName: kubernetes-dashboard
      nodeSelector:
        "kubernetes.io/os": linux
      # Comment the following tolerations if Dashboard must not be deployed on master
      tolerations:
        - key: node-role.kubernetes.io/master
          effect: NoSchedule

---

kind: Service
apiVersion: v1
metadata:
  labels:
    k8s-app: dashboard-metrics-scraper
  name: dashboard-metrics-scraper
  namespace: kubernetes-dashboard
spec:
  ports:
    - port: 8000
      targetPort: 8000
  selector:
    k8s-app: dashboard-metrics-scraper

---

kind: Deployment
apiVersion: apps/v1
metadata:
  labels:
    k8s-app: dashboard-metrics-scraper
  name: dashboard-metrics-scraper
  namespace: kubernetes-dashboard
spec:
  replicas: 1
  revisionHistoryLimit: 10
  selector:
    matchLabels:
      k8s-app: dashboard-metrics-scraper
  template:
    metadata:
      labels:
        k8s-app: dashboard-metrics-scraper
      annotations:
        seccomp.security.alpha.kubernetes.io/pod: 'runtime/default'
    spec:
      containers:
        - name: dashboard-metrics-scraper
          image: kubernetesui/metrics-scraper:v1.0.6
          ports:
            - containerPort: 8000
              protocol: TCP
          livenessProbe:
            httpGet:
              scheme: HTTP
              path: /
              port: 8000
            initialDelaySeconds: 30
            timeoutSeconds: 30
          volumeMounts:
          - mountPath: /tmp
            name: tmp-volume
          securityContext:
            allowPrivilegeEscalation: false
            readOnlyRootFilesystem: true
            runAsUser: 1001
            runAsGroup: 2001
      serviceAccountName: kubernetes-dashboard
      nodeSelector:
        "kubernetes.io/os": linux
      # Comment the following tolerations if Dashboard must not be deployed on master
      tolerations:
        - key: node-role.kubernetes.io/master
          effect: NoSchedule
      volumes:
        - name: tmp-volume
          emptyDir: {}
kubectl apply -f  recommended.yaml #创建

kubectl get svc -A |grep kubernetes-dashboard
## 找到端口,在安全组放行
- dashboard.yaml
vi
dashboard.yaml
apiVersion: v1
kind: ServiceAccount
metadata:
  name: admin-user
  namespace: kubernetes-dashboard
---
apiVersion: rbac.authorization.k8s.io/v1
kind: ClusterRoleBinding
metadata:
  name: admin-user
roleRef:
  apiGroup: rbac.authorization.k8s.io
  kind: ClusterRole
  name: cluster-admin
subjects:
- kind: ServiceAccount
  name: admin-user
  namespace: kubernetes-dashboard
kubectl apply -f dashboard.yaml
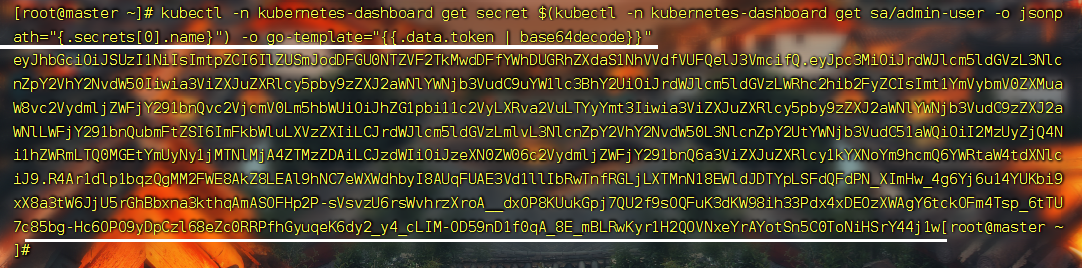
- 获取访问令牌
#获取访问令牌
kubectl -n kubernetes-dashboard get secret $(kubectl -n kubernetes-dashboard get sa/admin-user -o jsonpath="{.secrets[0].name}") -o go-template="{{.data.token | base64decode}}"
双击即可复制
- 测试
https://192.168.111.101:30009
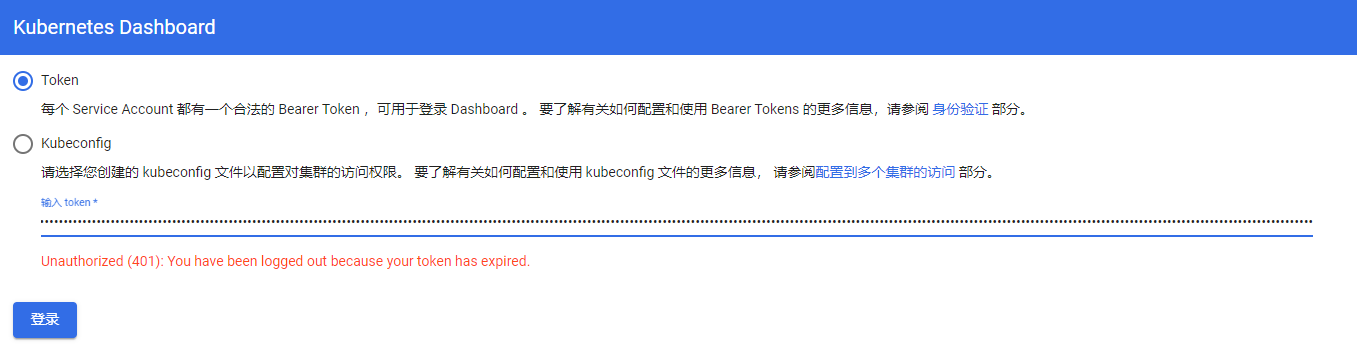
输入令牌进行访问!
- 错误

 kubeadm init \
--apiserver-advertise-address=192.168.111.101 \
--image-repository registry.aliyuncs.com/google_containers \
--kubernetes-version v1.20.15 \
--service-cidr=10.96.0.0/16 \
--pod-network-cidr=10.244.0.0/16

#  要保证各个网段 不一样
#	使用 kubeadm init时,请指定pod-network-cidr。确保 主机/主网络的ip 不在你引用的子网中!!!
#	即如果你的网络运行在192.168..使用10.0.0.0/16
#	如果你的网络是10.0..使用192.168.0.0/16
--pod-network-cidr=10.244.0.0/16 # 必须为10.244.0.0/16,与kube-flannel.yml,cni插件相同的地址
kube-flannel.yml片段
KubeSphere安装
安装KubeSphere前置环境
- 所有节点
#所有机器安装
yum install -y nfs-utils
- 主节点
#nfs主节点
echo "/nfs/data/ *(insecure,rw,sync,no_root_squash)" > /etc/exports
# /nfs/data/ :存放数据的目录
mkdir -p /nfs/data # 创建 存放数据的目录
systemctl enable rpcbind --now
systemctl enable nfs-server --now
#配置生效
exportfs -r
- 从节点
showmount -e 192.168.111.101


mkdir -p /app/data  # 应该 先创建目录,再挂载

mount -t nfs 192.168.111.101:/nfs/data /app/data # 挂载192.168.111.101:/nfs/data到本机的/app/data
# 写入一个测试文件,在从节点写入
echo "hello nfs server" >/app/data/test.txt
- 配置默认存储
StorageClass
配置动态供应的默认存储类
下载
nfs-subdir-external-provisioner.tar
下载metrics-server.tar
# 所有节点都操作
docker load -i  metrics-server.tar
docker load -i  nfs-subdir-external-provisioner.tar
storageclass.yaml
apiVersion: storage.k8s.io/v1
kind: StorageClass
metadata:
  name: nfs-storage
  annotations:
    storageclass.kubernetes.io/is-default-class: "true"
provisioner: k8s-sigs.io/nfs-subdir-external-provisioner
parameters:
  archiveOnDelete: "true"  ## 删除pv的时候,pv的内容是否要备份

---
apiVersion: apps/v1
kind: Deployment
metadata:
  name: nfs-client-provisioner
  labels:
    app: nfs-client-provisioner
  # replace with namespace where provisioner is deployed
  namespace: default
spec:
  replicas: 1
  strategy:
    type: Recreate
  selector:
    matchLabels:
      app: nfs-client-provisioner
  template:
    metadata:
      labels:
        app: nfs-client-provisioner
    spec:
      serviceAccountName: nfs-client-provisioner
      containers:
        - name: nfs-client-provisioner
          image: nfs-subdir-external-provisioner:v1.0
          # resources:
          #    limits:
          #      cpu: 10m
          #    requests:
          #      cpu: 10m
          volumeMounts:
            - name: nfs-client-root
              mountPath: /persistentvolumes
          env:
            - name: PROVISIONER_NAME
              value: k8s-sigs.io/nfs-subdir-external-provisioner
            - name: NFS_SERVER
              value: 192.168.111.101 ## 指定自己nfs服务器地址
            - name: NFS_PATH
              value: /nfs/data  ## nfs服务器共享的目录
      volumes:
        - name: nfs-client-root
          nfs:
            server: 192.168.111.101
            path: /nfs/data
---
apiVersion: v1
kind: ServiceAccount
metadata:
  name: nfs-client-provisioner
  # replace with namespace where provisioner is deployed
  namespace: default
---
kind: ClusterRole
apiVersion: rbac.authorization.k8s.io/v1
metadata:
  name: nfs-client-provisioner-runner
rules:
  - apiGroups: [""]
    resources: ["nodes"]
    verbs: ["get", "list", "watch"]
  - apiGroups: [""]
    resources: ["persistentvolumes"]
    verbs: ["get", "list", "watch", "create", "delete"]
  - apiGroups: [""]
    resources: ["persistentvolumeclaims"]
    verbs: ["get", "list", "watch", "update"]
  - apiGroups: ["storage.k8s.io"]
    resources: ["storageclasses"]
    verbs: ["get", "list", "watch"]
  - apiGroups: [""]
    resources: ["events"]
    verbs: ["create", "update", "patch"]
---
kind: ClusterRoleBinding
apiVersion: rbac.authorization.k8s.io/v1
metadata:
  name: run-nfs-client-provisioner
subjects:
  - kind: ServiceAccount
    name: nfs-client-provisioner
    # replace with namespace where provisioner is deployed
    namespace: default
roleRef:
  kind: ClusterRole
  name: nfs-client-provisioner-runner
  apiGroup: rbac.authorization.k8s.io
---
kind: Role
apiVersion: rbac.authorization.k8s.io/v1
metadata:
  name: leader-locking-nfs-client-provisioner
  # replace with namespace where provisioner is deployed
  namespace: default
rules:
  - apiGroups: [""]
    resources: ["endpoints"]
    verbs: ["get", "list", "watch", "create", "update", "patch"]
---
kind: RoleBinding
apiVersion: rbac.authorization.k8s.io/v1
metadata:
  name: leader-locking-nfs-client-provisioner
  # replace with namespace where provisioner is deployed
  namespace: default
subjects:
  - kind: ServiceAccount
    name: nfs-client-provisioner
    # replace with namespace where provisioner is deployed
    namespace: default
roleRef:
  kind: Role
  name: leader-locking-nfs-client-provisioner
  apiGroup: rbac.authorization.k8s.io
kubectl apply -f storageclass.yaml
#确认配置是否生效
kubectl get sc
Metrics-server
集群指标监控组件
metrics-server.yaml
apiVersion: v1
kind: ServiceAccount
metadata:
  labels:
    k8s-app: metrics-server
  name: metrics-server
  namespace: kube-system
---
apiVersion: rbac.authorization.k8s.io/v1
kind: ClusterRole
metadata:
  labels:
    k8s-app: metrics-server
    rbac.authorization.k8s.io/aggregate-to-admin: "true"
    rbac.authorization.k8s.io/aggregate-to-edit: "true"
    rbac.authorization.k8s.io/aggregate-to-view: "true"
  name: system:aggregated-metrics-reader
rules:
- apiGroups:
  - metrics.k8s.io
  resources:
  - pods
  - nodes
  verbs:
  - get
  - list
  - watch
---
apiVersion: rbac.authorization.k8s.io/v1
kind: ClusterRole
metadata:
  labels:
    k8s-app: metrics-server
  name: system:metrics-server
rules:
- apiGroups:
  - ""
  resources:
  - pods
  - nodes
  - nodes/stats
  - namespaces
  - configmaps
  verbs:
  - get
  - list
  - watch
---
apiVersion: rbac.authorization.k8s.io/v1
kind: RoleBinding
metadata:
  labels:
    k8s-app: metrics-server
  name: metrics-server-auth-reader
  namespace: kube-system
roleRef:
  apiGroup: rbac.authorization.k8s.io
  kind: Role
  name: extension-apiserver-authentication-reader
subjects:
- kind: ServiceAccount
  name: metrics-server
  namespace: kube-system
---
apiVersion: rbac.authorization.k8s.io/v1
kind: ClusterRoleBinding
metadata:
  labels:
    k8s-app: metrics-server
  name: metrics-server:system:auth-delegator
roleRef:
  apiGroup: rbac.authorization.k8s.io
  kind: ClusterRole
  name: system:auth-delegator
subjects:
- kind: ServiceAccount
  name: metrics-server
  namespace: kube-system
---
apiVersion: rbac.authorization.k8s.io/v1
kind: ClusterRoleBinding
metadata:
  labels:
    k8s-app: metrics-server
  name: system:metrics-server
roleRef:
  apiGroup: rbac.authorization.k8s.io
  kind: ClusterRole
  name: system:metrics-server
subjects:
- kind: ServiceAccount
  name: metrics-server
  namespace: kube-system
---
apiVersion: v1
kind: Service
metadata:
  labels:
    k8s-app: metrics-server
  name: metrics-server
  namespace: kube-system
spec:
  ports:
  - name: https
    port: 443
    protocol: TCP
    targetPort: https
  selector:
    k8s-app: metrics-server
---
apiVersion: apps/v1
kind: Deployment
metadata:
  labels:
    k8s-app: metrics-server
  name: metrics-server
  namespace: kube-system
spec:
  selector:
    matchLabels:
      k8s-app: metrics-server
  strategy:
    rollingUpdate:
      maxUnavailable: 0
  template:
    metadata:
      labels:
        k8s-app: metrics-server
    spec:
      containers:
      - args:
        - --cert-dir=/tmp
        - --kubelet-insecure-tls
        - --secure-port=4443
        - --kubelet-preferred-address-types=InternalIP,ExternalIP,Hostname
        - --kubelet-use-node-status-port
        image: metrics-server:v0.4.3
        imagePullPolicy: IfNotPresent
        livenessProbe:
          failureThreshold: 3
          httpGet:
            path: /livez
            port: https
            scheme: HTTPS
          periodSeconds: 10
        name: metrics-server
        ports:
        - containerPort: 4443
          name: https
          protocol: TCP
        readinessProbe:
          failureThreshold: 3
          httpGet:
            path: /readyz
            port: https
            scheme: HTTPS
          periodSeconds: 10
        securityContext:
          readOnlyRootFilesystem: true
          runAsNonRoot: true
          runAsUser: 1000
        volumeMounts:
        - mountPath: /tmp
          name: tmp-dir
      nodeSelector:
        kubernetes.io/os: linux
      priorityClassName: system-cluster-critical
      serviceAccountName: metrics-server
      volumes:
      - emptyDir: {}
        name: tmp-dir
---
apiVersion: apiregistration.k8s.io/v1
kind: APIService
metadata:
  labels:
    k8s-app: metrics-server
  name: v1beta1.metrics.k8s.io
spec:
  group: metrics.k8s.io
  groupPriorityMinimum: 100
  insecureSkipTLSVerify: true
  service:
    name: metrics-server
    namespace: kube-system
  version: v1beta1
  versionPriority: 100
kubectl apply -f metrics-server.yaml
安装KubeSphere
下载
ks-master.tar,主节点解压
下载ks-node.tar,从节点解压
docker load -i ks-master.tar
docker load -i ks-node.tar
- kubesphere-installer.yaml
---
apiVersion: apiextensions.k8s.io/v1beta1
kind: CustomResourceDefinition
metadata:
  name: clusterconfigurations.installer.kubesphere.io
spec:
  group: installer.kubesphere.io
  versions:
  - name: v1alpha1
    served: true
    storage: true
  scope: Namespaced
  names:
    plural: clusterconfigurations
    singular: clusterconfiguration
    kind: ClusterConfiguration
    shortNames:
    - cc

---
apiVersion: v1
kind: Namespace
metadata:
  name: kubesphere-system

---
apiVersion: v1
kind: ServiceAccount
metadata:
  name: ks-installer
  namespace: kubesphere-system

---
apiVersion: rbac.authorization.k8s.io/v1
kind: ClusterRole
metadata:
  name: ks-installer
rules:
- apiGroups:
  - ""
  resources:
  - '*'
  verbs:
  - '*'
- apiGroups:
  - apps
  resources:
  - '*'
  verbs:
  - '*'
- apiGroups:
  - extensions
  resources:
  - '*'
  verbs:
  - '*'
- apiGroups:
  - batch
  resources:
  - '*'
  verbs:
  - '*'
- apiGroups:
  - rbac.authorization.k8s.io
  resources:
  - '*'
  verbs:
  - '*'
- apiGroups:
  - apiregistration.k8s.io
  resources:
  - '*'
  verbs:
  - '*'
- apiGroups:
  - apiextensions.k8s.io
  resources:
  - '*'
  verbs:
  - '*'
- apiGroups:
  - tenant.kubesphere.io
  resources:
  - '*'
  verbs:
  - '*'
- apiGroups:
  - certificates.k8s.io
  resources:
  - '*'
  verbs:
  - '*'
- apiGroups:
  - devops.kubesphere.io
  resources:
  - '*'
  verbs:
  - '*'
- apiGroups:
  - monitoring.coreos.com
  resources:
  - '*'
  verbs:
  - '*'
- apiGroups:
  - logging.kubesphere.io
  resources:
  - '*'
  verbs:
  - '*'
- apiGroups:
  - jaegertracing.io
  resources:
  - '*'
  verbs:
  - '*'
- apiGroups:
  - storage.k8s.io
  resources:
  - '*'
  verbs:
  - '*'
- apiGroups:
  - admissionregistration.k8s.io
  resources:
  - '*'
  verbs:
  - '*'
- apiGroups:
  - policy
  resources:
  - '*'
  verbs:
  - '*'
- apiGroups:
  - autoscaling
  resources:
  - '*'
  verbs:
  - '*'
- apiGroups:
  - networking.istio.io
  resources:
  - '*'
  verbs:
  - '*'
- apiGroups:
  - config.istio.io
  resources:
  - '*'
  verbs:
  - '*'
- apiGroups:
  - iam.kubesphere.io
  resources:
  - '*'
  verbs:
  - '*'
- apiGroups:
  - notification.kubesphere.io
  resources:
  - '*'
  verbs:
  - '*'
- apiGroups:
  - auditing.kubesphere.io
  resources:
  - '*'
  verbs:
  - '*'
- apiGroups:
  - events.kubesphere.io
  resources:
  - '*'
  verbs:
  - '*'
- apiGroups:
  - core.kubefed.io
  resources:
  - '*'
  verbs:
  - '*'
- apiGroups:
  - installer.kubesphere.io
  resources:
  - '*'
  verbs:
  - '*'
- apiGroups:
  - storage.kubesphere.io
  resources:
  - '*'
  verbs:
  - '*'
- apiGroups:
  - security.istio.io
  resources:
  - '*'
  verbs:
  - '*'
- apiGroups:
  - monitoring.kiali.io
  resources:
  - '*'
  verbs:
  - '*'
- apiGroups:
  - kiali.io
  resources:
  - '*'
  verbs:
  - '*'
- apiGroups:
  - networking.k8s.io
  resources:
  - '*'
  verbs:
  - '*'
- apiGroups:
  - kubeedge.kubesphere.io
  resources:
  - '*'
  verbs:
  - '*'
- apiGroups:
  - types.kubefed.io
  resources:
  - '*'
  verbs:
  - '*'

---
kind: ClusterRoleBinding
apiVersion: rbac.authorization.k8s.io/v1
metadata:
  name: ks-installer
subjects:
- kind: ServiceAccount
  name: ks-installer
  namespace: kubesphere-system
roleRef:
  kind: ClusterRole
  name: ks-installer
  apiGroup: rbac.authorization.k8s.io

---
apiVersion: apps/v1
kind: Deployment
metadata:
  name: ks-installer
  namespace: kubesphere-system
  labels:
    app: ks-install
spec:
  replicas: 1
  selector:
    matchLabels:
      app: ks-install
  template:
    metadata:
      labels:
        app: ks-install
    spec:
      serviceAccountName: ks-installer
      containers:
      - name: installer
        image: kubesphere/ks-installer:v3.1.1
        imagePullPolicy: "Always"
        resources:
          limits:
            cpu: "1"
            memory: 1Gi
          requests:
            cpu: 20m
            memory: 100Mi
        volumeMounts:
        - mountPath: /etc/localtime
          name: host-time
      volumes:
      - hostPath:
          path: /etc/localtime
          type: ""
        name: host-time
- cluster-configuration.yaml
---
apiVersion: installer.kubesphere.io/v1alpha1
kind: ClusterConfiguration
metadata:
name: ks-installer
namespace: kubesphere-system
labels:
version: v3.1.1
spec:
persistence:
storageClass: "" # If there is no default StorageClass in your cluster, you need to specify an existing StorageClass here.
authentication:
jwtSecret: "" # Keep the jwtSecret consistent with the Host Cluster. Retrieve the jwtSecret by executing "kubectl -n kubesphere-system get cm kubesphere-config -o yaml | grep -v "apiVersion" | grep jwtSecret" on the Host Cluster.
local_registry: "" # Add your private registry address if it is needed.
etcd:
monitoring: false # Enable or disable etcd monitoring dashboard installation. You have to create a Secret for etcd before you enable it.
endpointIps: localhost # etcd cluster EndpointIps. It can be a bunch of IPs here.
port: 2379 # etcd port.
tlsEnable: true
common:
redis:
enabled: false
openldap:
enabled: false
minioVolumeSize: 20Gi # Minio PVC size.
openldapVolumeSize: 2Gi # openldap PVC size.
redisVolumSize: 2Gi # Redis PVC size.
monitoring:
# type: external # Whether to specify the external prometheus stack, and need to modify the endpoint at the next line.
endpoint: http://prometheus-operated.kubesphere-monitoring-system.svc:9090 # Prometheus endpoint to get metrics data.
es: # Storage backend for logging, events and auditing.
# elasticsearchMasterReplicas: 1 # The total number of master nodes. Even numbers are not allowed.
# elasticsearchDataReplicas: 1 # The total number of data nodes.
elasticsearchMasterVolumeSize: 4Gi # The volume size of Elasticsearch master nodes.
elasticsearchDataVolumeSize: 20Gi # The volume size of Elasticsearch data nodes.
logMaxAge: 7 # Log retention time in built-in Elasticsearch. It is 7 days by default.
elkPrefix: logstash # The string making up index names. The index name will be formatted as ks-<elk_prefix>-log.
basicAuth:
enabled: false
username: ""
password: ""
externalElasticsearchUrl: ""
externalElasticsearchPort: ""
console:
enableMultiLogin: true # Enable or disable simultaneous logins. It allows different users to log in with the same account at the same time.
port: 30880
alerting: # (CPU: 0.1 Core, Memory: 100 MiB) It enables users to customize alerting policies to send messages to receivers in time with different time intervals and alerting levels to choose from.
enabled: false # Enable or disable the KubeSphere Alerting System.
# thanosruler:
# replicas: 1
# resources: {}
auditing: # Provide a security-relevant chronological set of records,recording the sequence of activities happening on the platform, initiated by different tenants.
enabled: false # Enable or disable the KubeSphere Auditing Log System.
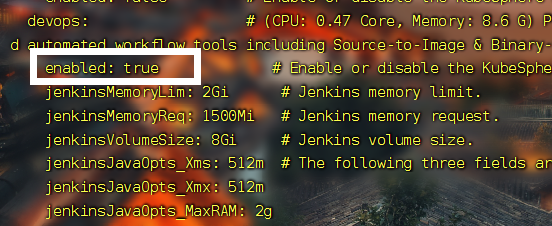
devops: # (CPU: 0.47 Core, Memory: 8.6 G) Provide an out-of-the-box CI/CD system based on Jenkins, and automated workflow tools including Source-to-Image & Binary-to-Image.
enabled: false # Enable or disable the KubeSphere DevOps System.
jenkinsMemoryLim: 2Gi # Jenkins memory limit.
jenkinsMemoryReq: 1500Mi # Jenkins memory request.
jenkinsVolumeSize: 8Gi # Jenkins volume size.
jenkinsJavaOpts_Xms: 512m # The following three fields are JVM parameters.
jenkinsJavaOpts_Xmx: 512m
jenkinsJavaOpts_MaxRAM: 2g
events: # Provide a graphical web console for Kubernetes Events exporting, filtering and alerting in multi-tenant Kubernetes clusters.
enabled: false # Enable or disable the KubeSphere Events System.
ruler:
enabled: true
replicas: 2
logging: # (CPU: 57 m, Memory: 2.76 G) Flexible logging functions are provided for log query, collection and management in a unified console. Additional log collectors can be added, such as Elasticsearch, Kafka and Fluentd.
enabled: false # Enable or disable the KubeSphere Logging System.
logsidecar:
enabled: true
replicas: 2
metrics_server: # (CPU: 56 m, Memory: 44.35 MiB) It enables HPA (Horizontal Pod Autoscaler).
enabled: false # Enable or disable metrics-server.
monitoring:
storageClass: "" # If there is an independent StorageClass you need for Prometheus, you can specify it here. The default StorageClass is used by default.
# prometheusReplicas: 1 # Prometheus replicas are responsible for monitoring different segments of data source and providing high availability.
prometheusMemoryRequest: 400Mi # Prometheus request memory.
prometheusVolumeSize: 20Gi # Prometheus PVC size.
# alertmanagerReplicas: 1 # AlertManager Replicas.
multicluster:
clusterRole: none # host | member | none # You can install a solo cluster, or specify it as the Host or Member Cluster.
network:
networkpolicy: # Network policies allow network isolation within the same cluster, which means firewalls can be set up between certain instances (Pods).
# Make sure that the CNI network plugin used by the cluster supports NetworkPolicy. There are a number of CNI network plugins that support NetworkPolicy, including Calico, Cilium, Kube-router, Romana and Weave Net.
enabled: false # Enable or disable network policies.
ippool: # Use Pod IP Pools to manage the Pod network address space. Pods to be created can be assigned IP addresses from a Pod IP Pool.
type: none # Specify "calico" for this field if Calico is used as your CNI plugin. "none" means that Pod IP Pools are disabled.
topology: # Use Service Topology to view Service-to-Service communication based on Weave Scope.
type: none # Specify "weave-scope" for this field to enable Service Topology. "none" means that Service Topology is disabled.
openpitrix: # An App Store that is accessible to all platform tenants. You can use it to manage apps across their entire lifecycle.
store:
enabled: false # Enable or disable the KubeSphere App Store.
servicemesh: # (0.3 Core, 300 MiB) Provide fine-grained traffic management, observability and tracing, and visualized traffic topology.
enabled: false # Base component (pilot). Enable or disable KubeSphere Service Mesh (Istio-based).
kubeedge: # Add edge nodes to your cluster and deploy workloads on edge nodes.
enabled: false # Enable or disable KubeEdge.
cloudCore:
nodeSelector: {"node-role.kubernetes.io/worker": ""}
tolerations: []
cloudhubPort: "10000"
cloudhubQuicPort: "10001"
cloudhubHttpsPort: "10002"
cloudstreamPort: "10003"
tunnelPort: "10004"
cloudHub:
advertiseAddress: # At least a public IP address or an IP address which can be accessed by edge nodes must be provided.
- "" # Note that once KubeEdge is enabled, CloudCore will malfunction if the address is not provided.
nodeLimit: "100"
service:
cloudhubNodePort: "30000"
cloudhubQuicNodePort: "30001"
cloudhubHttpsNodePort: "30002"
cloudstreamNodePort: "30003"
tunnelNodePort: "30004"
edgeWatcher:
nodeSelector: {"node-role.kubernetes.io/worker": ""}
tolerations: []
edgeWatcherAgent:
nodeSelector: {"node-role.kubernetes.io/worker": ""}
tolerations: []
安装
kubectl apply -f kubesphere-installer.yaml  #先

kubectl apply -f cluster-configuration.yaml #后
kubectl get pod -A  # 查看所有Pod
- 查看安装进度
kubectl logs -n kubesphere-system $(kubectl get pod -n kubesphere-system -l app=ks-install -o jsonpath='{.items[0].metadata.name}') -f
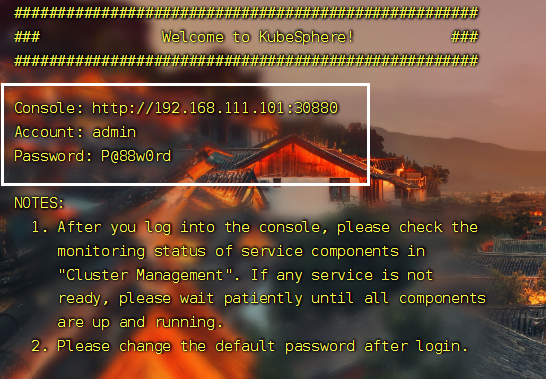
等待完成,就可以访问 !
- 访问
访问任意机器的 30880端口
账号 : admin
密码 : P@88w0rd
问题
- 解决etcd监控证书找不到问题
kubectl -n kubesphere-monitoring-system create secret generic kube-etcd-client-certs --from-file=etcd-client-ca.crt=/etc/kubernetes/pki/etcd/ca.crt --from-file=etcd-client.crt=/etc/kubernetes/pki/apiserver-etcd-client.crt --from-file=etcd-client.key=/etc/kubernetes/pki/apiserver-etcd-client.key
- 密码忘记
更改
admin的密码,在master节点运行命令
kubectl patch users admin -p '{"spec":{"password":"xxxxxx"}}' --type='merge' && kubectl annotate users admin iam.kubesphere.io/password-encrypted-
- 开启Devops
修改
cluster-configuration.yaml
devops:
	enabled: true #开启
重新加载配置
kubectl apply -f cluster-configuration.yaml
等待安装完成!
kubectl logs -n kubesphere-system $(kubectl get pod -n kubesphere-system -l app=ks-install -o jsonpath='{.items[0].metadata.name}') -f
K8s概述


K8s资源管理
- 命令式对象管理:直接使用命令去操作kubernetes的资源
kubectl run nginx-pod --image=nginx:1.17.1 --port=80
- 命令式对象配置:通过命令配置和配置文件去操作kubernetes的资源
kubectl apply -f nginx-pod.yaml
- 声明式对象配置:通过apply命令和配置文件去操作kubernetes的资源
kubectl apply -f nginx-pod.yaml

命令式对象管理
kubectl命令
kubectl是kubernetes集群的命令行工具,通过它能够对集群本身进行管理,并能够在集群上进行容器化应用的安装和部署。
● kubectl命令的语法如下:
kubectl [command] [type] [name] [flags]
● command:指定要对资源执行的操作,比如create、get、delete。
● type:指定资源的类型,比如deployment、pod、service。
● name:指定资源的名称,名称大小写敏感。
● flags:指定额外的可选参数
示例
kubectl get pods #查看所有的pod
kubectl get pod pod_name #查看某个pod
kubectl get pod pod_name -o yaml #查看某个pod,以yaml格式展示结果
操作(command)
kubernetes允许对资源进行多种操作,可以通过–help查看详细的操作命令:
kubectl --help
① 基本命令:

② 运行和调试:

③ 高级命令:

④ 其他命令:

资源类型(type)
kubernetes中所有的内容都抽象为资源,可以通过下面的命令进行查看:
kubectl api-resources
① 集群级别资源:
② Pod资源:
③ Pod资源控制器:
④ 服务发现资源:
⑤ 存储资源:
⑥ 配置资源:


应用示例
kubectl create namespace dev
kubectl get    namespace/ns
kubectl get    pods -n dev
命令式对象配置
创建一个nginx-pod.yaml,内容如下:
apiVersion: v1
kind: Namespace
metadata:
  name: dev
---
apiVersion: v1
kind: Pod
metadata:
  name: nginxpod
  namespace: dev
spec:
  containers:
    - name: nginx-containers
      image: nginx:1.17.1
一系列命令
kubectl create 	-f 	nginx-pod.yaml
kubectl get 	-f 	nginx-pod.yaml
kubectl delete 	-f 	nginx-pod.yaml
总结:命令式对象配置的方式操作资源,可以简单的认为:
命令+yaml配置文件(里面是命令需要的各种参数)
yaml(资源编排)
YAML 基本语法
- 使用空格做为缩进
- 缩进的空格数目不重要,只要相同层级的元素左侧对齐即可
- 低版本缩进时不允许使用Tab 键,只允许使用空格
- 使用#标识注释,从这个字符一直到行尾,都会被解释器忽略
- 使用 — 表示新的yaml文件开始
YAML 支持的数据结构对象
键值对的集合,又称为映射(mapping) / 哈希(hashes) / 字典(dictionary)
# 对象类型:对象的一组键值对,使用冒号结构表示
name: Tom
age: 18

# yaml 也允许另一种写法,将所有键值对写成一个行内对象
hash: {name: Tom, age: 18}
数组
# 数组类型:一组连词线开头的行,构成一个数组
People
- Tom
- Jack

# 数组也可以采用行内表示法
People: [Tom, Jack]
快速编写yaml使用kubectl create命令
这种方式一般用于资源没有部署的时候,我们可以直接创建一个YAML配置文件
# 尝试运行,并不会真正的创建镜像
kubectl create deployment web --image=nginx -o yaml --dry-run
或者我们可以输出到一个文件中
kubectl create deployment web --image=nginx -o yaml --dry-run > hello.yaml
然后我们就在文件中直接修改即可
使用kubectl get命令导出yaml文件
可以首先查看一个目前已经部署的镜像
kubectl get deploy
然后我们导出 nginx的配置
kubectl get deploy nginx -o=yaml --export > nginx.yaml
然后会生成一个
nginx.yaml的配置文件

K8S实战入门
Label
控制器和service的selector中
MatchLabels和lable的配置都是根据Pod的labels
Namespace
概述
● Namespace是kubernetes系统中一种非常重要的资源,它的主要作用是用来实现多套系统的资源隔离或者多租户的资源隔离。
● 默认情况下,kubernetes集群中的所有Pod都是可以相互访问的。但是在实际中,可能不想让两个Pod之间进行互相的访问,那么此时就可以将两个Pod划分到不同的Namespace下。kubernetes通过将集群内部的资源分配到不同的Namespace中,可以形成逻辑上的“组”,以方便不同的组的资源进行隔离使用和管理。
● 可以通过kubernetes的授权机制,将不同的Namespace交给不同租户进行管理,这样就实现了多租户的资源隔离。此时还能结合kubernetes的资源配额机制,限定不同租户能占用的资源,例如CPU使用量、内存使用量等等,来实现租户可用资源的管理。

kubernetes在集群启动之后,会默认创建几个namespace。
命令式
kubectl get ns #查看所有命名空间
kubectl create namespace dev #创建命名空间
kubectl delete ns dev #删除命名空间dev

- default:所有
未指定的Namespace的对象都会被分配在default命名空间。 - kube-node-lease:集群节点之间的心跳维护,v1.13开始引入。
- kube-public:此命名空间的资源可以被所有人访问(包括未认证用户)。
- kube-system:所有由kubernetes系统创建的资源都处于这个命名空间
命令式对象配置
① 新建ns-dev.yaml:
apiVersion: v1
kind: Namespace
metadata:
  name: dev
② 通过命令式对象配置进行创建和删除:
kubectl create -f ns-dev.yaml
kubectl delete -f ns-dev.yaml
Pod
命令式对象配置
① 新建pod-nginx.yaml:
apiVersion: v1
kind: Pod
metadata:
  name: nginx
  namespace: dev
spec:
  containers:
  - image: nginx:1.17.1
    imagePullPolicy: IfNotPresent
    name: pod
    ports:
    - name: nginx-port
      containerPort: 80
      protocol: TCP
② 执行命令:
kubectl create -f pod-nginx.yaml
kubectl delete -f pod-nginx.yaml
kubectl describe pod nginx -n dev #查看名称为dev的namespace下的Pod的名称为nginx的详细信息
# 获取Pod的IP
kubectl get pods [-n dev] -o wide
Deployment
概述
● 在kubernetes中,Pod是最小的控制单元,但是kubernetes很少直接控制Pod,一般都是通过Pod控制器来完成的。
● Pod控制器用于Pod的管理,确保Pod资源符合预期的状态,当Pod的资源出现故障的时候,会尝试进行重启或重建Pod。
● 在kubernetes中Pod控制器的种类有很多,本章节只介绍一种:Deployment。
命令式对象配置
① 创建一个deploy-nginx.yaml,内容如下:
apiVersion: apps/v1
kind: Deployment
metadata:
  name: nginx
  namespace: dev
spec:
  replicas: 3
  selector:
    matchLabels:
      run: nginx
  template:
    metadata:
      labels:
        run: nginx
    spec:
      containers:
      - image: nginx:1.17.1
        name: nginx
        ports:
        - containerPort: 80
          protocol: TCP
② 执行创建和删除命令:
kubectl create -f deploy-nginx.yaml
kubectl delete -f deploy-nginx.yaml
语法:查看创建的Pod
kubectl get pods [-n 命名空间]
kubectl get pods -n dev    #示例:查看名称为dev的namespace下通过deployment创建的3个Pod
kubectl get deployment [-n 命名空间] #查看deployment的信息
kubectl get deploy [-n 命名空间]
kubectl describe deployment xxx [-n 命名空间] #查看deployment的详细信息
Service
概述
我们已经能够利用Deployment来创建一组Pod来提供具有高可用性的服务,虽然每个Pod都会分配一个单独的Pod的IP地址,但是却存在如下的问题:
○ Pod的IP会随着Pod的重建产生变化。
○ Pod的IP仅仅是集群内部可见的虚拟的IP,外部无法访问。
● 这样对于访问这个服务带来了难度,因此,kubernetes设计了Service来解决这个问题。
● Service可以看做是一组同类的Pod对外的访问接口,借助Service,应用可以方便的实现服务发现和负载均衡。

应用示例
语法:暴露Service
kubectl expose deployment xxx
--name=服务名 --type=ClusterIP  #设置type类型,NodePort、ClusterIP
--port=暴露的端口  ## pod暴露的端口
--target-port=镜像产生容器的端口 [-n 命名空间] #如nginx就是80,tomcat就是8080
# 会产生一个CLUSTER-IP,这个就是service的IP,在Service的生命周期内,这个地址是不会变化的
#暴露名为test的namespace下的名为nginx的deployment,并设置服务名为svc-nginx1
kubectl expose deployment nginx --name=svc-nginx1 --type=ClusterIP --port=80 --target-port=80 -n test
# 查看Service
kubectl get service [-n 命名空间]
kubectl get svc [-n 命名空间]
kubectl delete service svc-nginx1 -n test
对象配置方式
① 新建svc-nginx.yaml,内容如下:
apiVersion: v1
kind: Service
metadata:
  name: svc-nginx
  namespace: dev
spec:
  clusterIP: 10.109.179.231
  ports:
  - port: 80
    protocol: TCP
    targetPort: 80
  selector:
    run: nginx
  type: ClusterIP
② 执行命令:
kubectl  create  -f  svc-nginx.yaml
kubectl  delete  -f  svc-nginx.yaml
kubectl delete   service xxx [-n 命名空间]
Pod
Pod的结构

每个Pod中都包含一个或者多个容器,这些容器可以分为两类:
● ① 用户程序所在的容器,数量可多可少。
● ② Pause容器,这是每个Pod都会有的一个根容器,它的作用有两个:
○ 可以以它为依据,评估整个Pod的健康状况。
○ 可以在根容器上设置IP地址,其它容器都共享此IP(Pod的IP),以实现Pod内部的网络通信(这里是Pod内部的通讯,Pod之间的通讯采用虚拟二层网络技术来实现,我们当前环境使用的是Flannel)
Pod定义
- 下面是Pod的资源清单:
apiVersion: v1     #必选,版本号,例如v1
kind: Pod         #必选,资源类型,例如 Pod
metadata:         #必选,元数据
  name: string     #必选,Pod名称
  namespace: string  #Pod所属的命名空间,默认为"default"
  labels:           #自定义标签列表
    - name: string
spec:  #必选,Pod中容器的详细定义
  containers:  #必选,Pod中容器列表
  - name: string   #必选,容器名称
    image: string  #必选,容器的镜像名称
    imagePullPolicy: [ Always|Never|IfNotPresent ]  #获取镜像的策略
    command: [string]   #容器的启动命令列表,如不指定,使用打包时使用的启动命令
    args: [string]      #容器的启动命令参数列表
    workingDir: string  #容器的工作目录
    volumeMounts:       #挂载到容器内部的存储卷配置
    - name: string      #引用pod定义的共享存储卷的名称,需用volumes[]部分定义的的卷名
      mountPath: string #存储卷在容器内mount的绝对路径,应少于512字符
      readOnly: boolean #是否为只读模式
    ports: #需要暴露的端口库号列表
    - name: string        #端口的名称
      containerPort: int  #容器需要监听的端口号
      hostPort: int       #容器所在主机需要监听的端口号,默认与Container相同
      protocol: string    #端口协议,支持TCP和UDP,默认TCP
    env:   #容器运行前需设置的环境变量列表
    - name: string  #环境变量名称
      value: string #环境变量的值
    resources: #资源限制和请求的设置
      limits:  #资源限制的设置
        cpu: string     #Cpu的限制,单位为core数,将用于docker run --cpu-shares参数
        memory: string  #内存限制,单位可以为Mib/Gib,将用于docker run --memory参数
      requests: #资源请求的设置
        cpu: string    #Cpu请求,容器启动的初始可用数量
        memory: string #内存请求,容器启动的初始可用数量
    lifecycle: #生命周期钩子
		postStart: #容器启动后立即执行此钩子,如果执行失败,会根据重启策略进行重启
		preStop: #容器终止前执行此钩子,无论结果如何,容器都会终止
    livenessProbe:  #对Pod内各容器健康检查的设置,当探测无响应几次后将自动重启该容器
      exec:         #对Pod容器内检查方式设置为exec方式
        command: [string]  #exec方式需要制定的命令或脚本
      httpGet:       #对Pod内个容器健康检查方法设置为HttpGet,需要制定Path、port
        path: string
        port: number
        host: string
        scheme: string
        HttpHeaders:
        - name: string
          value: string
      tcpSocket:     #对Pod内个容器健康检查方式设置为tcpSocket方式
         port: number
       initialDelaySeconds: 0       #容器启动完成后首次探测的时间,单位为秒
       timeoutSeconds: 0          #对容器健康检查探测等待响应的超时时间,单位秒,默认1秒
       periodSeconds: 0           #对容器监控检查的定期探测时间设置,单位秒,默认10秒一次
       successThreshold: 0
       failureThreshold: 0
       securityContext:
         privileged: false
  restartPolicy: [Always | Never | OnFailure]  #Pod的重启策略
  nodeName: <string> #设置NodeName表示将该Pod调度到指定到名称的node节点上
  nodeSelector: obeject #设置NodeSelector表示将该Pod调度到包含这个label的node上
  imagePullSecrets: #Pull镜像时使用的secret名称,以key:secretkey格式指定
  - name: string
  hostNetwork: false   #是否使用主机网络模式,默认为false,如果设置为true,表示使用宿主机网络
  volumes:   #在该pod上定义共享存储卷列表
  - name: string    #共享存储卷名称 (volumes类型有很多种)
    emptyDir: {}       #类型为emtyDir的存储卷,与Pod同生命周期的一个临时目录。为空值
    hostPath: string   #类型为hostPath的存储卷,表示挂载Pod所在宿主机的目录
      path: string                #Pod所在宿主机的目录,将被用于同期中mount的目录
    secret:          #类型为secret的存储卷,挂载集群与定义的secret对象到容器内部
      scretname: string
      items:
      - key: string
        path: string
    configMap:         #类型为configMap的存储卷,挂载预定义的configMap对象到容器内部
      name: string
      items:
      - key: string
        path: string
- 查看资源类型为pod的可配置项
kubectl explain pod #查看资源类型为pod的可配置项
kubectl explain pod.metadata # 查看资源类型为Pod的metadata的属性的可配置项
基本配置
- 创建pod-base.yaml文件,内容如下:
apiVersion: v1
kind: Pod
metadata:
  name: pod-base
  namespace: dev
  labels:
    user: dhy
spec:
  containers:
    - name: nginx # 容器名称
      image: nginx:1.17.1 # 容器需要的镜像地址
    - name: busybox # 容器名称
      image: busybox:1.30 # 容器需要的镜像地址
kubectl apply -f pod-base.yaml
kubectl get pod -n dev
# 此时已经运行起来了一个基本的Pod,虽然它暂时有问题
kubectl describe pod pod-base -n dev #通过describe查看内部的详情
kubectl get pod -n dev -o wide #查看ip
镜像拉取策略
- 创建pod-imagepullpolicy.yaml文件,内容如下:
apiVersion: v1
kind: Pod
metadata:
  name: pod-imagepullpolicy
  namespace: dev
  labels:
    user: dhy
spec:
  containers:
    - name: nginx # 容器名称
      image: nginx:1.17.1 # 容器需要的镜像地址
      imagePullPolicy: Always # 用于设置镜像的拉取策略
    - name: busybox # 容器名称
      image: busybox:1.30 # 容器需要的镜像地址
● imagePullPolicy:用于设置镜像拉取的策略,kubernetes支持配置三种拉取策略:
○ Always:总是从远程仓库拉取镜像(一直远程下载)。
○ IfNotPresent:本地有则使用本地镜像,本地没有则从远程仓库拉取镜像(本地有就用本地,本地没有就使用远程下载)。
○ Never:只使用本地镜像,从不去远程仓库拉取,本地没有就报错(一直使用本地,没有就报错)。
默认值说明:
如果镜像tag为具体的版本号,默认策略是IfNotPresent。
如果镜像tag为latest(最终版本),默认策略是Always。
# 在容器中执行命令
# kubectl exec -it pod的名称 -n 命名空间 -c 容器名称 /bin/sh
kubectl exec -it pod-imagepullpolicy -n dev -c nginx /bin/sh
资源配额
● 容器中的程序要运行,肯定会占用一定的资源,比如CPU和内存等,如果不对某个容器的资源做限制,那么它就可能吃掉大量的资源,导致其他的容器无法运行。针对这种情况,kubernetes提供了对内存和CPU的资源进行配额的机制,这种机制主要通过resources选项实现,它有两个子选项:
○ limits:用于限制运行的容器的最大占用资源,当容器占用资源超过limits时会被终止,并进行重启。
○ requests:用于设置容器需要的最小资源,如果环境资源不够,容器将无法启动。
● 可以通过上面的两个选项设置资源的上下限。
● 创建pod-resoures.yaml文件,内容如下:
apiVersion: v1
kind: Pod
metadata:
  name: pod-resoures
  namespace: dev
  labels:
    user: dhy
spec:
  containers:
    - name: nginx # 容器名称
      image: nginx:1.17.1 # 容器需要的镜像地址
      imagePullPolicy: IfNotPresent # 设置镜像拉取策略
      ports: # 端口设置
        - name: nginx-port # 端口名称,如果执行,必须保证name在Pod中是唯一的
          containerPort: 80 # 容器要监听的端口 (0~65536)
          protocol: TCP # 端口协议
      resources: # 资源配额
        limits: # 限制资源的上限
          cpu: "2" # CPU限制,单位是core数
          memory: "10Gi" # 内存限制
        requests: # 限制资源的下限
          cpu: "1" # CPU限制,单位是core数
          memory: "10Mi" # 内存限制
- cpu:core数,可以为整数或小数。
- memory:内存大小,可以使用Gi、Mi、G、M等形式。
一系列命令
kubectl create -f pod-resoures.yaml # 创建Pod
kubectl get pod pod-resoures -n dev #查看发现Pod运行正常
kubectl delete -f pod-resoures.yaml # 接下来,停止Pod
编辑Pod,修改resources.requests.memory的值为10Gi:
apiVersion: v1
kind: Pod
metadata:
  name: pod-resoures
  namespace: dev
  labels:
    user: dhy
spec:
  containers:
    - name: nginx # 容器名称
      image: nginx:1.17.1 # 容器需要的镜像地址
      imagePullPolicy: IfNotPresent # 设置镜像拉取策略
      ports: # 端口设置
        - name: nginx-port # 端口名称,如果执行,必须保证name在Pod中是唯一的
          containerPort: 80 # 容器要监听的端口 (0~65536)
          protocol: TCP # 端口协议
      resources: # 资源配额
        limits: # 限制资源的上限
          cpu: "2" # CPU限制,单位是core数
          memory: "10Gi" # 内存限制
        requests: # 限制资源的下限
          cpu: "1" # CPU限制,单位是core数
          memory: "10Gi" # 内存限制
kubectl create -f pod-resource.yaml # 再次启动Pod:
kubectl get pod pod-resoures -n dev -o wide # 查看Pod状态,发现Pod启动失败:
kubectl describe pod pod-resoures -n dev #查看Pod详情会发现,如下提示:

创建和终止
● 初始化容器是在Pod的主容器启动之前要运行的容器,主要是做一些主容器的前置工作,它具有两大特征:
○ ① 初始化容器必须运行完成直至结束,如果某个初始化容器运行失败,那么kubernetes需要重启它直至成功完成。
○ ② 初始化容器必须按照定义的顺序执行,当且仅当前一个成功之后,后面的一个才能运行。
● 初始化容器有很多的应用场景,下面列出的是最常见的几个:
○ 提供主容器镜像中不具备的工具程序或自定义代码。
○ 初始化容器要先于应用容器串行启动并运行完成,因此可用于延后应用容器的启动直至其依赖的条件得到满足。
● 接下来做一个案例,模拟下面这个需求:
○ 假设要以主容器来运行Nginx,但是要求在运行Nginx之前要能够连接上MySQL和Redis所在的服务器。
○ 为了简化测试,事先规定好MySQL和Redis所在的IP地址分别为192.168.18.103和192.168.18.104(注意,这两个IP都不能ping通,因为环境中没有这两个IP)。
● 创建pod-initcontainer.yaml文件,内容如下:
apiVersion: v1
kind: Pod
metadata:
  name: pod-initcontainer
  namespace: dev
  labels:
    user: xudaxian
spec:
  containers: # 容器配置
    - name: nginx
      image: nginx:1.17.1
      imagePullPolicy: IfNotPresent
      ports:
        - name: nginx-port
          containerPort: 80
          protocol: TCP
      resources:
        limits:
          cpu: "2"
          memory: "10Gi"
        requests:
          cpu: "1"
          memory: "10Mi"
  initContainers: # 初始化容器配置
    - name: test-mysql
      image: busybox:1.30
      command: ["sh","-c","until ping 192.168.18.103 -c 1;do echo waiting for mysql ...;sleep 2;done;"]
      securityContext:
        privileged: true # 使用特权模式运行容器
    - name: test-redis
      image: busybox:1.30
      command: ["sh","-c","until ping 192.168.18.104 -c 1;do echo waiting for redis ...;sleep 2;done;"]
钩子函数
apiVersion: v1
kind: Pod
metadata:
  name: pod-hook-exec
  namespace: dev
  labels:
    user: dhy
spec:
  containers: # 容器配置
    - name: nginx
      image: nginx:1.17.1
      imagePullPolicy: IfNotPresent
      ports:
        - name: nginx-port
          containerPort: 80
          protocol: TCP
      resources:
        limits:
          cpu: "2"
          memory: "10Gi"
        requests:
          cpu: "1"
          memory: "10Mi"
      lifecycle: # 生命周期配置
        postStart: # 容器创建之后执行,如果失败会重启容器
          exec: # 在容器启动的时候,执行一条命令,修改掉Nginx的首页内容
            command: ["/bin/sh","-c","echo postStart ... > /usr/share/nginx/html/index.html"]
        preStop: # 容器终止之前执行,执行完成之后容器将成功终止,在其完成之前会阻塞删除容器的操作
          exec: # 在容器停止之前停止Nginx的服务
            command: ["/usr/sbin/nginx","-s","quit"]
创建Pod:
kubectl create -f pod-hook-exec.yaml
查看Pod:
kubectl get pod pod-hook-exec -n dev -o wide

访问Pod:
curl 10.244.1.11

容器探测
● 容器探测用于检测容器中的应用实例是否正常工作,是保障业务可用性的一种传统机制。如果经过探测,实例的状态不符合预期,那么kubernetes就会把该问题实例“摘除”,不承担业务流量。kubernetes提供了两种探针来实现容器探测,分别是:
○ liveness probes:存活性探测,用于检测应用实例当前是否处于正常运行状态,如果不是,k8s会重启容器。
○ readiness probes:就绪性探测,用于检测应用实例是否可以接受请求,如果不能,k8s不会转发流量。
- livenessProbe:存活性探测,决定是否重启容器。
- readinessProbe:就绪性探测,决定是否将请求转发给容器。
k8s在1.16版本之后新增了startupProbe探针,用于判断容器内应用程序是否已经启动。如果配置了startupProbe探针,就会先禁止其他的探针,直到startupProbe探针成功为止,一旦成功将不再进行探测。
exec方式
apiVersion: v1
kind: Pod
metadata:
  name: pod-liveness-exec
  namespace: dev
  labels:
    user: dhy
spec:
  containers: # 容器配置
    - name: nginx
      image: nginx:1.17.1
      imagePullPolicy: IfNotPresent
      ports:
        - name: nginx-port
          containerPort: 80
          protocol: TCP
      livenessProbe: # 存活性探针
        exec:
          command: ["/bin/cat","/tmp/hello.txt"] # 执行一个查看文件的命令,必须失败,因为根本没有这个文件
tcpSocket方式
apiVersion: v1
kind: Pod
metadata:
  name: pod-liveness-tcpsocket
  namespace: dev
  labels:
    user: dhy
spec:
  containers: # 容器配置
    - name: nginx
      image: nginx:1.17.1
      imagePullPolicy: IfNotPresent
      ports:
        - name: nginx-port
          containerPort: 80
          protocol: TCP
      livenessProbe: # 存活性探针
        tcpSocket:
          port: 8080 # 尝试访问8080端口,必须失败,因为Pod内部只有一个Nginx容器,而且只是监听了80端口
httpGet方式
apiVersion: v1
kind: Pod
metadata:
  name: pod-liveness-httpget
  namespace: dev
  labels:
    user: dhy
spec:
  containers: # 容器配置
    - name: nginx
      image: nginx:1.17.1
      imagePullPolicy: IfNotPresent
      ports:
        - name: nginx-port
          containerPort: 80
          protocol: TCP
      livenessProbe: # 存活性探针
        httpGet: # 其实就是访问http://127.0.0.1:80/hello
          port: 80 # 端口号
          scheme: HTTP # 支持的协议,HTTP或HTTPS
          path: /hello # URI地址
          host: 127.0.0.1 # 主机地址
FIELDS:
exec
tcpSocket
httpGet
initialDelaySeconds # 容器启动后等待多少秒执行第一次探测
timeoutSeconds # 探测超时时间。默认1秒,最小1秒
periodSeconds # 执行探测的频率。默认是10秒,最小1秒
failureThreshold # 连续探测失败多少次才被认定为失败。默认是3。最小值是1
successThreshold # 连续探测成功多少次才被认定为成功。默认是1
重启策略
● 在容器探测中,一旦容器探测出现了问题,kubernetes就会对容器所在的Pod进行重启,其实这是由Pod的重启策略决定的,Pod的重启策略有3种,分别如下:
○ Always:容器失效时,自动重启该容器,默认值。
○ OnFailure:容器终止运行且退出码不为0时重启(异常终止时重启)。
○ Never:不论状态如何,都不重启该容器。
● 重启策略适用于Pod对象中的所有容器,首次需要重启的容器,将在其需要的时候立即进行重启,随后再次重启的操作将由kubelet延迟一段时间后进行,且反复的重启操作的延迟时长以此为10s、20s、40s、80s、160s和300s,300s是最大的延迟时长。
● 创建pod-restart-policy.yaml文件,内容如下:
apiVersion: v1
kind: Pod
metadata:
  name: pod-restart-policy
  namespace: dev
  labels:
    user: dhy
spec:
  containers: # 容器配置
    - name: nginx
      image: nginx:1.17.1
      imagePullPolicy: IfNotPresent
      ports:
        - name: nginx-port
          containerPort: 80
          protocol: TCP
      livenessProbe: # 存活性探测
        httpGet:
          port: 80
          path: /hello
          host: 127.0.0.1
          scheme: HTTP
  restartPolicy: Never # 重启策略
调度策略
定向调度
定向调度,指的是利用在Pod上声明的
nodeName或nodeSelector,以此将Pod调度到期望的Node节点上。注意,这里的调度是强制的,这就意味着即使要调度的目标Node不存在,也会向上面进行调度,只不过Pod运行失败而已。
nodeName
● nodeName用于强制约束将Pod调度到指定的name的Node节点上。这种方式,其实是直接跳过Scheduler的调度逻辑,直接将Pod调度到指定名称的节点。
● 创建一个pod-nodename.yaml文件,内容如下:
apiVersion: v1
kind: Pod
metadata:
  name: pod-nodename
  namespace: dev
  labels:
    user: dhy
spec:
  containers: # 容器配置
    - name: nginx
      image: nginx:1.17.1
      imagePullPolicy: IfNotPresent
      ports:
        - name: nginx-port
          containerPort: 80
          protocol: TCP
  nodeName: k8s-node1 # 指定调度到k8s-node1节点上
- 创建Pod:
kubectl create -f pod-nodename.yaml
- 查看Pod:
kubectl get pod pod-nodename -n dev -o wide

nodeSelector
nodeSelector用于将Pod调度到添加了指定标签的Node节点上,它是通过kubernetes的label-selector机制实现的,换言之,在Pod创建之前,会由Scheduler使用MatchNodeSelector调度策略进行label匹配,找出目标node,然后将Pod调度到目标节点,该匹配规则是强制约束。
首先给node节点添加标签:
kubectl label node k8s-node1 nodeenv=pro
kubectl label node k8s-node2 nodeenv=test

创建pod-nodeselector.yaml文件,内容如下:
apiVersion: v1
kind: Pod
metadata:
  name: pod-nodeselector
  namespace: dev
spec:
  containers: # 容器配置
    - name: nginx
      image: nginx:1.17.1
      imagePullPolicy: IfNotPresent
      ports:
        - name: nginx-port
          containerPort: 80
          protocol: TCP
  nodeSelector:
    nodeenv: pro # 指定调度到具有nodeenv=pro的Node节点上
亲和性调度
● 虽然定向调度的两种方式,使用起来非常方便,但是也有一定的问题,那就是如果没有满足条件的Node,那么Pod将不会被运行,即使在集群中还有可用的Node列表也不行,这就限制了它的使用场景。
● 基于上面的问题,kubernetes还提供了一种亲和性调度(Affinity)。它在nodeSelector的基础之上进行了扩展,可以通过配置的形式,实现优先选择满足条件的Node进行调度,如果没有,也可以调度到不满足条件的节点上,使得调度更加灵活。
● Affinity主要分为三类:
○ nodeAffinity(node亲和性):以Node为目标,解决Pod可以调度到哪些Node的问题。
○ podAffinity(pod亲和性):以Pod为目标,解决Pod可以和那些已存在的Pod部署在同一个拓扑域中的问题。
○ podAntiAffinity(pod反亲和性):以Pod为目标,解决Pod不能和那些已经存在的Pod部署在同一拓扑域中的问题。
关于亲和性和反亲和性的使用场景的说明:
亲和性:如果两个应用频繁交互,那么就有必要利用亲和性让两个应用尽可能的靠近,这样可以较少因网络通信而带来的性能损耗。
反亲和性:当应用采用多副本部署的时候,那么就有必要利用反亲和性让各个应用实例打散分布在各个Node上,这样可以提高服务的高可用性。
nodeAffinity
查看nodeAffinity的可选配置项:
pod.spec.affinity.nodeAffinity
  requiredDuringSchedulingIgnoredDuringExecution  Node节点必须满足指定的所有规则才可以,相当于硬限制
    nodeSelectorTerms  节点选择列表
      matchFields   按节点字段列出的节点选择器要求列表
      matchExpressions   按节点标签列出的节点选择器要求列表(推荐)
        key    键
        values 值
        operator 关系符 支持Exists, DoesNotExist, In, NotIn, Gt, Lt
  preferredDuringSchedulingIgnoredDuringExecution 优先调度到满足指定的规则的Node,相当于软限制 (倾向)
    preference   一个节点选择器项,与相应的权重相关联
      matchFields 按节点字段列出的节点选择器要求列表
      matchExpressions   按节点标签列出的节点选择器要求列表(推荐)
        key 键
        values 值
        operator 关系符 支持In, NotIn, Exists, DoesNotExist, Gt, Lt
    weight 倾向权重,在范围1-100。
关系符的使用说明:
- matchExpressions:
	- key: nodeenv # 匹配存在标签的key为nodeenv的节点
	  operator: Exists
	- key: nodeenv # 匹配标签的key为nodeenv,且value是"xxx"或"yyy"的节点
	  operator: In
      values: ["xxx","yyy"]
    - key: nodeenv # 匹配标签的key为nodeenv,且value大于"xxx"的节点
      operator: Gt
      values: "xxx"
apiVersion: v1
kind: Pod
metadata:
  name: pod-nodeaffinity-required
  namespace: dev
spec:
  containers: # 容器配置
    - name: nginx
      image: nginx:1.17.1
      imagePullPolicy: IfNotPresent
      ports:
        - name: nginx-port
          containerPort: 80
          protocol: TCP
  affinity: # 亲和性配置
    nodeAffinity: # node亲和性配置
      requiredDuringSchedulingIgnoredDuringExecution: # Node节点必须满足指定的所有规则才可以,相当于硬规则,类似于定向调度
        nodeSelectorTerms: # 节点选择列表
          - matchExpressions:
              - key: nodeenv # 匹配存在标签的key为nodeenv的节点,并且value是"xxx"或"yyy"的节点
                operator: In
                values:
                  - "xxx"
                  - "yyy"
污点和容忍
污点(Taints)
● 前面的调度方式都是站在Pod的角度上,通过在Pod上添加属性,来确定Pod是否要调度到指定的Node上,其实我们也可以站在Node的角度上,通过在Node上添加污点属性,来决定是否运行Pod调度过来。
● Node被设置了污点之后就和Pod之间存在了一种相斥的关系,进而拒绝Pod调度进来,甚至可以将已经存在的Pod驱逐出去。
● 污点的格式为:key=value:effect,key和value是污点的标签,effect描述污点的作用,支持如下三个选项:
○ PreferNoSchedule:kubernetes将尽量避免把Pod调度到具有该污点的Node上,除非没有其他节点可以调度。
○ NoSchedule:kubernetes将不会把Pod调度到具有该污点的Node上,但是不会影响当前Node上已经存在的Pod。
○ NoExecute:kubernetes将不会把Pod调度到具有该污点的Node上,同时也会将Node上已经存在的Pod驱逐。
● 语法:
kubectl taint node xxx key=value:effect #设置污点:
kubectl taint node xxx key:effect- #去除污点
kubectl taint node xxx key- #去除所有污点
kubectl describe node 节点名称 #查看指定节点上的污点
问题
0/2 nodes are available: 1 Insufficient memory, 1 node(s) had taint
通过查看yaml中的资源需求,确定了
待部署的deployment所需内存仅有1G。
   resources:
     limits:
       cpu: "1"
       memory: 2Gi
     requests:
       cpu: 500m
       memory: 1Gi
查看集群的
CPU和内存资源的申明占用情况
kubectl describe node |grep -E '((Name|Roles):\s{6,})|(\s+(memory|cpu)\s+[0-9]+\w{0,2}.+%\))'

解决
清理已安装的k8s对象,既可以删除一部分,也可以将某些对象的requests的值换成一个更小的数。扩容k8s集群。修改待安装的deployment的requests的值,减少申明的所需内存。
Pod控制器
介绍
- 概念
● 在kubernetes中,按照Pod的创建方式可以将其分为两类:
○ 自主式Pod:kubernetes直接创建出来的Pod,这种Pod删除后就没有了,也不会重建。
○ 控制器创建Pod:通过Pod控制器创建的Pod,这种Pod删除之后还会自动重建。
● Pod控制器:Pod控制器是管理Pod的中间层,使用了Pod控制器之后,我们只需要告诉Pod控制器,想要多少个什么样的Pod就可以了,它就会创建出满足条件的Pod并确保每一个Pod处于用户期望的状态,如果Pod在运行中出现故障,控制器会基于指定的策略重启或重建Pod。
- Pod和Controller的关系
-
Pod是通过 Controller实现 应用的运维,比如
弹性伸缩,滚动升级等 -
Pod 和 Controller之间是 通过
label标签来建立关系,同时Controller又被称为控制器工作负载
异常
- 删除ns,一直处于Terminating状态中
kubectl  get  namespace  命名空间  -o json > 命名空间.json
cat 命名空间.json

kubectl proxy --port=8081 #新开一个会话运行,保证以下端口可以访问
curl -k -H "Content-Type: application/json" -X PUT --data-binary  \
@命名空间.json  http://127.0.0.1:8081/api/v1/namespaces/命名空间/finalize
查看结果
kubectl get ns #命名空间已经被删除
- Pod卡在Terminating状态
强制删除Pod
kubectl delete pod [pod-name] -n [命名空间] --grace-period=0 --force
查看结果
kubectl get pod -A # 已经完成删除
- pod处于pending状态
去除污点!
- Pod 一直处于 ContainerCreating 或 Waiting 状态
Deployment

● Deployment的主要功能如下:
○ 支持ReplicaSet的所有功能。
○ 支持发布的停止、继续。
○ 支持版本滚动更新和版本回退。
● Deployment的资源清单:
apiVersion: apps/v1 # 版本号
kind: Deployment # 类型
metadata: # 元数据
  name: # rs名称
  namespace: # 所属命名空间
  labels: #标签
    controller: deploy
spec: # 详情描述
  replicas: 3 # 副本数量
  revisionHistoryLimit: 3 # 保留历史版本,默认为10
  paused: false # 暂停部署,默认是false
  progressDeadlineSeconds: 600 # 部署超时时间(s),默认是600
  strategy: # 策略
    type: RollingUpdate # 滚动更新策略
    rollingUpdate: # 滚动更新
      maxSurge: 30% # 最大额外可以存在的副本数,可以为百分比,也可以为整数
      maxUnavailable: 30% # 最大不可用状态的    Pod 的最大值,可以为百分比,也可以为整数
  selector: # 选择器,通过它指定该控制器管理哪些pod
    matchLabels: # Labels匹配规则
      app: nginx-pod
    matchExpressions: # Expressions匹配规则
      - {key: app, operator: In, values: [nginx-pod]}
  template: # 模板,当副本数量不足时,会根据下面的模板创建pod副本
    metadata:
      labels:
        app: nginx-pod
    spec:
      containers:
      - name: nginx
        image: nginx:1.17.1
        ports:
        - containerPort: 80
- 创建Deployment
创建pc-deployment.yaml文件,内容如下:
apiVersion: apps/v1 # 版本号
kind: Deployment # 类型
metadata: # 元数据
  name: pc-deployment # deployment的名称
  namespace: dev # 命名类型
spec: # 详细描述
  replicas: 3 # 副本数量
  selector: # 选择器,通过它指定该控制器可以管理哪些Pod
    matchLabels: # Labels匹配规则
      app: nginx-pod
  template: # 模块 当副本数据不足的时候,会根据下面的模板创建Pod副本
    metadata:
      labels:
        app: nginx-pod
    spec:
      containers:
        - name: nginx # 容器名称
          image: nginx:1.17.1 # 容器需要的镜像地址
          ports:
            - containerPort: 80 # 容器所监听的端口
创建Deployment:
kubectl apply -f pc-deployment.yaml
- 扩缩容
使用`scale`命令实现扩缩容:
kubectl scale deploy pc-deployment --replicas=1 -n dev

编辑
Deployment的副本数量,修改spec:replicas:5即可。
kubectl edit deployment pc-deployment -n dev
kubectl get pod  -n dev
kubectl get deploy   -n dev

- 镜像更新
deployment支持两种镜像更新的策略:`重建更新`和`滚动更新`(默认),可以通过`strategy`选项进行配置。
strategy: #指定新的Pod替代旧的Pod的策略,支持两个属性
  type: #指定策略类型,支持两种策略
    Recreate:#在创建出新的Pod之前会先杀掉所有已经存在的Pod
    RollingUpdate:#滚动更新,就是杀死一部分,就启动一部分,在更新过程中,存在两个版本的Pod
  rollingUpdate:#当type为RollingUpdate的时候生效,用于为rollingUpdate设置参数,支持两个属性:
    maxUnavailable:#用来指定在升级过程中 不可用 的Pod的最大数量,默认为25%。
    maxSurge: #用来指定在升级过程中 可以超过期望 的Pod的最大数量,默认为25%。
- 重建更新/滚动更新
编辑
pc-deployment.yaml文件,在spec节点下添加更新策略
apiVersion: apps/v1 # 版本号
kind: Deployment # 类型
metadata: # 元数据
  name: pc-deployment # deployment的名称
  namespace: dev # 命名类型
spec: # 详细描述
  replicas: 3 # 副本数量
  strategy: # 镜像更新策略
    type: Recreate # Recreate:在创建出新的Pod之前会先杀掉所有已经存在的Pod
  		# 	type: RollingUpdate # RollingUpdate:滚动更新,就是 杀死一部分,就启动一部分,在更新过程中,存在两个版本的Pod
   		#	rollingUpdate:
   	 	# 		maxUnavailable: 25%
     	#		maxSurge: 25%
  selector: # 选择器,通过它指定该控制器可以管理哪些Pod
    matchLabels: # Labels匹配规则
      app: nginx-pod
  template: # 模块 当副本数据不足的时候,会根据下面的模板创建Pod副本
    metadata:
      labels:
        app: nginx-pod
    spec:
      containers:
        - name: nginx # 容器名称
          image: nginx:1.17.1 # 容器需要的镜像地址
          ports:
            - containerPort: 80 # 容器所监听的端口
kubectl apply -f pc-deployment.yaml #更新Deployment
kubectl set image deployment pc-deployment nginx=nginx:1.17.2 -n dev #镜像升级
kubectl get pod -n dev -w #查看升级过程
- 版本回退
Deployment支持版本升级过程中的暂停、继续功能以及版本回退等诸多功能,下面具体来看
# 版本升级相关功能
kubectl rollout 参数 deploy xx  # 支持下面的选择
# status 显示当前升级的状 态
# history 显示 升级历史记录
# pause 暂停版本升级过程
# resume 继续已经暂停的版本升级过程
# restart 重启版本升级过程
# undo 回滚到上一级版本 (可以使用--to-revision回滚到指定的版本)
kubectl rollout history deploy xx # 查看 xx的升级历史记录
查看当前升级版本的状态:
kubectl rollout status deployment pc-deployment  -n dev
# 可以使用-to-revision=1回退到1版本,如果省略这个选项,就是回退到上个版本,即2版本
kubectl rollout undo deployment pc-deployment --to-revision=1 -n dev #版本回退
Service介绍
概述
● 在kubernetes中,Pod是应用程序的载体,我们可以通过Pod的IP来访问应用程序,但是Pod的IP地址不是固定的,这就意味着不方便直接采用Pod的IP对服务进行访问。
● 为了解决这个问题,kubernetes提供了Service资源,Service会对提供同一个服务的多个Pod进行聚合,并且提供一个统一的入口地址,通过访问Service的入口地址就能访问到后面的Pod服务。
Service在很多情况下只是一个概念,真正起作用的其实是kube-proxy服务进程,每个Node节点上都运行了一个kube-proxy的服务
进程。当创建Service的时候会通过API Server向etcd写入创建的Service的信息,而kube-proxy会基于监听的机制发现这种Service的变化,然后它会将最新的Service信息转换为对应的访问规则。
防止Pod失联【服务发现】

定义Pod访问策略【负载均衡】
页面
前端的Pod访问到后端的Pod,中间会通过Service一层,而Service在这里还能做负载均衡,负载均衡的策略有很多种实现策略,例如:
- 随机
- 轮询
- 响应比
Pod和Service的关系
这里Pod 和 Service 之间还是根据
label 和 selector 建立关联的 【和Controller一样】

Service常用类型
- ClusterIp:集群内部访问
- NodePort:对外访问应用使用
- LoadBalancer:对外访问应用使用,公有云
Service类型
Service的资源清单:
apiVersion: v1 # 版本
kind: Service # 类型
metadata: # 元数据
  name: # 资源名称
  namespace: # 命名空间
spec:
  selector: # 标签选择器,用于确定当前Service代理那些Pod
    app: nginx
  type: NodePort # Service的类型,指定Service的访问方式
  clusterIP: # 虚拟服务的IP地址
  sessionAffinity: # session亲和性,支持ClientIP、None两个选项,默认值为None
  ports: # 端口信息
    - port: 8080 # Service端口
      protocol: TCP # 协议
      targetPort : # Pod端口
      nodePort:  # 主机端口
spec.type的说明:
- ClusterIP:默认值,它是kubernetes系统
自动分配的虚拟IP,只能在集群内部访问。 - NodePort:将Service通过指定的Node上的端口暴露给外部,通过此方法,就可以在集群外部访问服务。
- LoadBalancer:使用外接负载均衡器完成到服务的负载分发,注意此模式需要外部云环境的支持。
- ExternalName:把集群外部的服务引入集群内部,直接使用。
Service使用
● 在使用Service之前,首先利用Deployment创建出3个Pod,注意要为Pod设置app=nginx-pod的标签。
● 创建deployment.yaml文件,内容如下:
apiVersion: apps/v1
kind: Deployment
metadata:
  name: pc-deployment
  namespace: dev
spec:
  replicas: 3
  selector:
    matchLabels:
      app: nginx-pod
  template:
    metadata:
      labels:
        app: nginx-pod
    spec:
      containers:
        - name: nginx
          image: nginx:1.17.1
          ports:
            - containerPort: 80
创建Deployment:
kubectl apply -f deployment.yaml
查看Pod信息:
kubectl get pod -n dev -o wide --show-labels

为了方便后面的测试,修改三台Nginx的index.html:
kubectl exec -it  pc-deployment-7d7dd5499b-59qkm -c nginx -n dev /bin/sh
# 	进入pod,选择nginx这个容器,在dev这个namespace下, /bin/bash 命令
echo "10.244.1.30" > /usr/share/nginx/html/index.html # > 重定向到index.html页面,覆盖其中内容
测试访问:
curl 10.244.0.31:80
curl 10.244.0.32:80
curl 10.244.0.33:80

ClusterIP类型的Service
- 创建Service
创建service-clusterip.yaml文件,内容如下:
apiVersion: v1
kind: Service
metadata:
  name: service-clusterip
  namespace: dev
spec:
  selector:
    app: nginx-pod
  clusterIP: 10.244.11.11 # service的IP地址,如果不写,默认会生成一个
  type: ClusterIP
  ports:
    - port: 80 # Service的端口
      targetPort: 80 # Pod的端口
创建Service:
kubectl apply -f service-clusterip.yaml
- 查看Service
kubectl get svc -n dev -o wide

- 查看Service的详细信息
kubectl describe svc service-clusterip -n dev

- 访问

默认的负载策略为rr(轮询),ClusterIP意思是给Service分配的是只有当前k8s集群内部才能访问的ip,外部无法访问
NodePort类型的 Service
创建的Service的IP地址只能在集群内部才可以访问,如果希望Service暴露给集群外部使用,那么就需要使用到另外一种类型的Service,称为NodePort类型的Service。NodePort的工作原理就是将Service的端口映射到Node的一个端口上,然后就可以通过NodeIP:NodePort来访问Service了
- 创建Service
创建service-nodeport.yaml文件,内容如下:
apiVersion: v1
kind: Service
metadata:
  name: service-nodeport
  namespace: dev
spec:
  selector:
    app: nginx-pod
  type: NodePort # Service类型为NodePort
  ports:
    - port: 80 # Service的端口
      targetPort: 80 # Pod的端口
      nodePort: 30002 # 指定绑定的node的端口(默认取值范围是30000~32767),如果不指定,会默认分配
创建Service:
kubectl apply -f service-nodeport.yaml
查看Service
kubectl get svc service-nodeport -n dev -o wide # -o wide 查看详细信息

- 访问

LoadBalancer类型的Service
LoadBalancer和NodePort很相似,目的都是向外部暴露一个端口,区别在于LoadBalancer会在集群的外部再来做一个负载均衡设备,而这个设备需要外部环境的支持,外部服务发送到这个设备上的请求,会被设备负载之后转发到集群中。

Ingress
Ingress和Pod关系
pod 和 ingress 是通过service进行关联的,而ingress作为统一入口,由service关联一组pod中
Ingress工作流程
在实际的访问中,我们都是需要维护很多域名, a.com 和 b.com
然后不同的域名对应的不同的Service,然后service管理不同的pod
使用Ingress
- 配置ingress-controller
ingress-controller.yaml
apiVersion: v1
kind: Namespace
metadata:
  name: ingress
  labels:
    app.kubernetes.io/name: ingress
    app.kubernetes.io/part-of: ingress

---

kind: ConfigMap
apiVersion: v1
metadata:
  name: nginx-configuration
  namespace: ingress
  labels:
    app.kubernetes.io/name: ingress
    app.kubernetes.io/part-of: ingress

---
kind: ConfigMap
apiVersion: v1
metadata:
  name: tcp-services
  namespace: ingress
  labels:
    app.kubernetes.io/name: ingress
    app.kubernetes.io/part-of: ingress

---
kind: ConfigMap
apiVersion: v1
metadata:
  name: udp-services
  namespace: ingress
  labels:
    app.kubernetes.io/name: ingress
    app.kubernetes.io/part-of: ingress

---
apiVersion: v1
kind: ServiceAccount
metadata:
  name: nginx-ingress-serviceaccount
  namespace: ingress
  labels:
    app.kubernetes.io/name: ingress
    app.kubernetes.io/part-of: ingress

---
apiVersion: rbac.authorization.k8s.io/v1beta1
kind: ClusterRole
metadata:
  name: nginx-ingress-clusterrole
  labels:
    app.kubernetes.io/name: ingress
    app.kubernetes.io/part-of: ingress
rules:
  - apiGroups:
      - ""
    resources:
      - configmaps
      - endpoints
      - nodes
      - pods
      - secrets
    verbs:
      - list
      - watch
  - apiGroups:
      - ""
    resources:
      - nodes
    verbs:
      - get
  - apiGroups:
      - ""
    resources:
      - services
    verbs:
      - get
      - list
      - watch
  - apiGroups:
      - ""
    resources:
      - events
    verbs:
      - create
      - patch
  - apiGroups:
      - "extensions"
      - "networking.k8s.io"
    resources:
      - ingresses
    verbs:
      - get
      - list
      - watch
  - apiGroups:
      - "extensions"
      - "networking.k8s.io"
    resources:
      - ingresses/status
    verbs:
      - update

---
apiVersion: rbac.authorization.k8s.io/v1beta1
kind: Role
metadata:
  name: nginx-ingress-role
  namespace: ingress
  labels:
    app.kubernetes.io/name: ingress
    app.kubernetes.io/part-of: ingress
rules:
  - apiGroups:
      - ""
    resources:
      - configmaps
      - pods
      - secrets
      - namespaces
    verbs:
      - get
  - apiGroups:
      - ""
    resources:
      - configmaps
    resourceNames:
      # Defaults to "<election-id>-<ingress-class>"
      # Here: "<ingress-controller-leader>-<nginx>"
      # This has to be adapted if you change either parameter
      # when launching the nginx-ingress-controller.
      - "ingress-controller-leader-nginx"
    verbs:
      - get
      - update
  - apiGroups:
      - ""
    resources:
      - configmaps
    verbs:
      - create
  - apiGroups:
      - ""
    resources:
      - endpoints
    verbs:
      - get

---
apiVersion: rbac.authorization.k8s.io/v1beta1
kind: RoleBinding
metadata:
  name: nginx-ingress-role-nisa-binding
  namespace: ingress
  labels:
    app.kubernetes.io/name: ingress
    app.kubernetes.io/part-of: ingress
roleRef:
  apiGroup: rbac.authorization.k8s.io
  kind: Role
  name: nginx-ingress-role
subjects:
  - kind: ServiceAccount
    name: nginx-ingress-serviceaccount
    namespace: ingress

---
apiVersion: rbac.authorization.k8s.io/v1beta1
kind: ClusterRoleBinding
metadata:
  name: nginx-ingress-clusterrole-nisa-binding
  labels:
    app.kubernetes.io/name: ingress
    app.kubernetes.io/part-of: ingress
roleRef:
  apiGroup: rbac.authorization.k8s.io
  kind: ClusterRole
  name: nginx-ingress-clusterrole
subjects:
  - kind: ServiceAccount
    name: nginx-ingress-serviceaccount
    namespace: ingress

---

apiVersion: apps/v1
kind: Deployment
metadata:
  name: nginx-ingress-controller
  namespace: ingress
  labels:
    app.kubernetes.io/name: ingress
    app.kubernetes.io/part-of: ingress
spec:
  replicas: 1
  selector:
    matchLabels:
      app.kubernetes.io/name: ingress
      app.kubernetes.io/part-of: ingress
  template:
    metadata:
      labels:
        app.kubernetes.io/name: ingress
        app.kubernetes.io/part-of: ingress
      annotations:
        prometheus.io/port: "10254"
        prometheus.io/scrape: "true"
    spec:
      hostNetwork: true
      # wait up to five minutes for the drain of connections
      terminationGracePeriodSeconds: 300
      serviceAccountName: nginx-ingress-serviceaccount
      nodeSelector:
        kubernetes.io/os: linux
      containers:
        - name: nginx-ingress-controller
          image: lizhenliang/nginx-ingress-controller:0.30.0
          args:
            - /nginx-ingress-controller
            - --configmap=$(POD_NAMESPACE)/nginx-configuration
            - --tcp-services-configmap=$(POD_NAMESPACE)/tcp-services
            - --udp-services-configmap=$(POD_NAMESPACE)/udp-services
            - --publish-service=$(POD_NAMESPACE)/ingress
            - --annotations-prefix=nginx.ingress.kubernetes.io
          securityContext:
            allowPrivilegeEscalation: true
            capabilities:
              drop:
                - ALL
              add:
                - NET_BIND_SERVICE
            # www-data -> 101
            runAsUser: 101
          env:
            - name: POD_NAME
              valueFrom:
                fieldRef:
                  fieldPath: metadata.name
            - name: POD_NAMESPACE
              valueFrom:
                fieldRef:
                  fieldPath: metadata.namespace
          ports:
            - name: http
              containerPort: 80
              protocol: TCP
            - name: https
              containerPort: 443
              protocol: TCP
          livenessProbe:
            failureThreshold: 3
            httpGet:
              path: /healthz
              port: 10254
              scheme: HTTP
            initialDelaySeconds: 10
            periodSeconds: 10
            successThreshold: 1
            timeoutSeconds: 10
          readinessProbe:
            failureThreshold: 3
            httpGet:
              path: /healthz
              port: 10254
              scheme: HTTP
            periodSeconds: 10
            successThreshold: 1
            timeoutSeconds: 10
          lifecycle:
            preStop:
              exec:
                command:
                  - /wait-shutdown

---

apiVersion: v1
kind: LimitRange
metadata:
  name: ingress
  namespace: ingress
  labels:
    app.kubernetes.io/name: ingress
    app.kubernetes.io/part-of: ingress
spec:
  limits:
  - min:
      memory: 90Mi
      cpu: 100m
    type: Container
创建
ingress-controller
# 需要执行两次 kubectl apply -f ingress-controller.yaml !
kubectl apply -f ingress-controller.yaml
kubectl apply -f ingress-controller.yaml
查看
ingress-controller
kubectl get pods -n ingress
- 创建tomcat和Nginx
创建
控制器,tomcat-nginx.yaml
apiVersion: apps/v1
kind: Deployment
metadata:
  name: tomcat-deployment
spec: # 详细描述
  replicas: 1
  selector:
    matchLabels:
      app: tomcat-pod
  template: # 模块 当副本数据不足的时候,会根据下面的模板创建Pod副本
    metadata:
      labels:
        app: tomcat-pod
    spec:
      containers:
        - name: tomcat
          image: tomcat:8.0
          ports:
            - containerPort: 8080

---
apiVersion: v1
kind: Service
metadata:
  name: tomcat
spec:
  selector:
    app: tomcat-pod
  type: NodePort
  ports:
    - port: 8080
      targetPort: 8080
---
apiVersion: apps/v1
kind: Deployment
metadata:
  name: nginx-deployment
spec: # 详细描述
  replicas: 1
  selector:
    matchLabels:
      app: nginx-pod
  template: # 模块 当副本数据不足的时候,会根据下面的模板创建Pod副本
    metadata:
      labels:
        app: nginx-pod
    spec:
      containers:
        - name: nginx
          image: nginx:1.18.0
          ports:
            - containerPort: 80

---
apiVersion: v1
kind: Service
metadata:
  name: nginx
spec:
  selector:
    app: nginx-pod
  type: NodePort
  ports:
    - port: 80
      targetPort: 80
运行命令,创建
deploy和svc
kubectl apply -f tomcat-nginx.yaml
查看pod,svc,deploy
kubectl get pod
kubectl get deploy
kubectl get svc

- 创建ingress规则文件
ingress-rule.yaml
---
# http
apiVersion: networking.k8s.io/v1beta1
kind: Ingress
metadata:
  name: tomcat-nginx-ingress
spec:
  rules:
  - host: example.nginx.com
    http:
      paths:
      - path: /
        backend:
          serviceName: nginx
          servicePort: 80
  - host: example.tomcat.com
    http:
      paths:
       - path: /
         backend:
           serviceName: tomcat
           servicePort: 8080

---
# https
# apiVersion: networking.k8s.io/v1beta1
# kind: Ingress
# metadata:
#   name: tls-example-ingress
# spec:
#   tls:
#   - hosts:
#     - sslexample.ctnrs.com
#     secretName: secret-tls
#   rules:
#     - host: sslexample.ctnrs.com
#       http:
#         paths:
#         - path: /
#           backend:
#             serviceName: web
#             servicePort: 80
kubectl apply -f ingress-rule.yaml
kubectl get ingress

- 配置hosts文件
C:\Windows\System32\drivers\etc

加入以下
两个配置
192.168.111.101 example.nginx.com
192.168.111.101 example.tomcat.com
- 访问
流程据我理解是这样:
浏览器输入http://example.tomcat.com/,代理到
192.168.111.101这个地址,然后ingress-rule规则判断来源是example.tomcat.com,然后把它转到service名为tomcat的服务,并且端口是8080,然后转到Pod的8080端口,完成请求!


完成配置!
K8s持久化存储、配置管理
nfs
- 所有节点
#所有机器安装
yum install -y nfs-utils
- 主节点
#nfs主节点
echo "/app/nfs/data/ *(insecure,rw,sync,no_root_squash)" > /etc/exports
# /app/nfs/data/ :存放数据的目录
mkdir -p /app/nfs/data # 创建 存放数据的目录
systemctl enable rpcbind --now
systemctl enable nfs-server --now
#配置生效
exportfs -r
- 从节点
showmount -e 192.168.111.101


mkdir -p /app/nfs/data  # 应该 先创建目录,再挂载

mount -t nfs 192.168.111.101:/app/nfs/data /app/data # 挂载192.168.111.101:/app/nfs/data到本机的/app/data
# 写入一个测试文件
echo "hello nfs server" >/app/data/test.txt
- 创建Pod
nfs-nginx.yaml
apiVersion: apps/v1
kind: Deployment
metadata:
  name: nginx-dep
spec:
  replicas: 1
  selector:
    matchLabels:
      app: nginx
  template:
    metadata:
      labels:
        app: nginx
    spec:
      containers:
      - name: nginx
        image: nginx:1.18.0
        volumeMounts:
        - name: root
          mountPath: /usr/share/nginx/html
        ports:
        - containerPort: 80
      volumes:
        - name: root
          nfs:
            server: 192.168.111.101
            path: /app/data/nfs

查看Pod

- 创建文件
 cd /app/data/nfs/
 vim index.html
 <h1> Hello World!</h1>

- 访问测试
kubectl expose deploy nginx-dep --port=80 --type=NodePort --target-port=80
kubectl get svc #查看服务


PV、PVC
● 前面我们已经学习了使用NFS提供存储,此时就要求用户会搭建NFS系统,并且会在yaml配置nfs。由于kubernetes支持的存储系统有很多,要求客户全部掌握,显然不现实。为了能够屏蔽底层存储实现的细节,方便用户使用,kubernetes引入了PV和PVC两种资源对象。
● PV(Persistent Volume)是持久化卷的意思,是对底层的共享存储的一种抽象。一般情况下PV由kubernetes管理员进行创建和配置,它和底层具体的共享存储技术有关,并通过插件完成和共享存储的对接。
● PVC(Persistent Volume Claim)是持久化卷声明的意思,是用户对于存储需求的一种声明。换言之,PVC其实就是用户向kubernetes系统发出的一种资源需求申请。
- PV的使用
pvc.yaml
apiVersion: v1
kind: PersistentVolumeClaim
metadata:
  name: my-pvc
spec:
  accessModes:
    - ReadWriteMany
  resources:
    requests:
      storage: 5Gi
pv.yaml
apiVersion: v1
kind: PersistentVolume
metadata:
  name: my-pv
spec:
  capacity:
    storage: 5Gi
  accessModes:
    - ReadWriteMany
  nfs:
    path: /app/data/nfs
    server: 192.168.111.101
pv-nginx.yaml
apiVersion: apps/v1
kind: Deployment
metadata:
  name: nginx-dep
spec:
  replicas: 1
  selector:
    matchLabels:
      app: nginx
  template:
    metadata:
      labels:
        app: nginx
    spec:
      containers:
      - name: nginx
        image: nginx:1.18.0
        volumeMounts:
        - name: root
          mountPath: /usr/share/nginx/html
        ports:
        - containerPort: 80
      volumes:
        - name: root
          persistentVolumeClaim:
            claimName: my-pvc
kubectl apply -f pvc.yaml
kubectl apply -f pv.yaml
kubectl apply -f pv-nginx.yaml

查看Pod、PV、PVC
kubectl get po
kubectl get pv
kubectl get pvc

- 暴露服务
kubectl expose deploy nginx-dep --port=80 --type=NodePort --target-port=80
kubectl get svc #查看服务

- 创建文件
 cd /app/data/nfs/
 vim index.html
 <h1> Hello World!</h1>

- 访问测试
kubectl get svc


Secret
Secret的主要作用就是加密数据,然后存在etcd里面,让Pod容器以挂载Volume方式进行访问
场景:用户名 和 密码进行加密
一般场景的是对某个字符串进行base64编码 进行加密
echo -n 'admin' | base64

- 变量形式挂载到Pod
创建secret加密数据的yaml文件
secret.yaml
apiVersion: v1
kind: Secret
metadata:
  name: mysecret
type: Opaque
data:
  username: YWRtaW4=
  password: MWYyZDFlMmU2N2Rm
创建Secret
kubectl apply -f secret.yaml
查看Secret
kubectl get secret

secret-var.yaml
apiVersion: v1
kind: Pod
metadata:
  name: mypod
spec:
  containers:
  - name: nginx
    image: nginx:1.18.0
    env:
      - name: SECRET_USERNAME
        valueFrom:
          secretKeyRef:
            name: mysecret
            key: username
      - name: SECRET_PASSWORD
        valueFrom:
          secretKeyRef:
            name: mysecret
            key: password
创建Pod
kubectl apply -f secret-var.yaml

进入容器,查看结果
kubectl exec -it mypod /bin/bash
echo $SECRET_USERNAME
echo $SECRET_PASSWORD

删除Pod
kubectl delete -f secret-var.yaml
- 数据卷形式挂载
创建secret加密数据的yaml文件
secret.yaml
apiVersion: v1
kind: Secret
metadata:
  name: mysecret
type: Opaque
data:
  username: YWRtaW4=
  password: MWYyZDFlMmU2N2Rm
创建Secret
kubectl apply -f secret.yaml
secret-vol.yaml
apiVersion: v1
kind: Pod
metadata:
  name: mypod
spec:
  containers:
  - name: nginx
    image: nginx:1.18.0
    volumeMounts:
    - name: foo
      mountPath: "/etc/foo"
      readOnly: true
  volumes:
  - name: foo
    secret:
      secretName: mysecret
创建Pod
kubectl apply -f secret-vol.yaml
进入容器,查看结果
kubectl exec -it mypod /bin/bash
ls /etc/foo

ConfigMap
ConfigMap作用是存储不加密的数据到etcd中,让Pod以变量或数据卷Volume挂载到容器中
应用场景:
配置文件
创建配置文件
首先我们需要创建一个配置文件
redis.properties
redis.port=127.0.0.1
redis.port=6379
redis.password=123456
创建ConfigMap
使用命令创建configmap
kubectl create configmap redis-config --from-file=redis.properties # --from-file 表示从哪个文件生成configmap
然后查看详细信息
kubectl describe cm redis-config

变量的形式挂载到Pod
创建我们的配置文件
myconfig.yaml
apiVersion: v1
kind: ConfigMap
metadata:
  name: myconfig
  namespace: default
data:
  special.level: info
  special.type: hello
# 创建ConfigMap
kubectl apply -f myconfig.yaml
# 获取
kubectl get cm

configmap-var.yaml
apiVersion: v1
kind: Pod
metadata:
  name: mypod
spec:
  containers:
    - name: busybox
      image: busybox
      command: [ "/bin/sh", "-c", "echo $(LEVEL) ---$(TYPE)" ]
      env:
        - name: LEVEL
          valueFrom:
            configMapKeyRef:
              name: myconfig
              key: special.level
        - name: TYPE
          valueFrom:
            configMapKeyRef:
              name: myconfig
              key: special.type
  restartPolicy: Never
创建Pod
kubectl apply -f configmap-var.yaml
查看Pod
查看结果

kubectl logs pod mypod

数据卷形式挂载
创建我们的配置文件
myconfig.yaml
apiVersion: v1
kind: ConfigMap
metadata:
  name: myconfig
  namespace: default
data:
  special.level: info
  special.type: hello
# 创建ConfigMap
kubectl apply -f myconfig.yaml
# 获取
kubectl get cm

configmap-vol.yaml
提前准备好redis-config
apiVersion: v1
kind: Pod
metadata:
  name: mypod
spec:
  containers:
    - name: busybox
      image: busybox
      command: [ "/bin/sh","-c","cat /etc/config/redis.properties" ]
      volumeMounts:
      - name: configmap-volume
        mountPath: /etc/config
  volumes:
    - name: configmap-volume
      configMap:
        name: redis-config
  restartPolicy: Never
kubectl apply -f configmap-vol.yaml
kubectl describe cm redis-config


查看结果
kubectl logs mypod

完成!
k8s部署项目
k8s中部署Java项目的流程
● ① 通过Dockerfile制作镜像。
● ② 将镜像推送到镜像仓库,比如阿里云镜像仓库等。
● ③ Pod控制器部署镜像。
● ④ 创建Service或Ingress对外暴露应用。
● ⑤ 对集群进行监控、升级等。
k8s中部署Java项目
制作镜像
- 准备java项目,然后打包得到对应的jar包 — 这一步演示过程省略
- 在项目的根目录下新建Dockerfile文件:
FROM java:8
VOLUME /tmp
ADD demo-0.0.1-SNAPSHOT.jar /tmp/dc.jar
EXPOSE 8080
CMD java -jar /tmp/dc.jar
制作镜像
# spring是 镜像的名称,1.0是版本,镜像名 不能 有大写字母
docker build -t spring:1.0 .
推送镜像

往下拉

阿里云
创建命名空间:
点击个人实例

阿里云
创建镜像仓库


部署镜像暴露应用
创建
deployment.yaml文件,内容如下:
apiVersion: apps/v1
kind: Deployment  # 创建控制器,通过控制器创建Pod
metadata:
  labels:
    app: spring # 该控制器的label
  name: spring
spec:
  replicas: 1
  selector:
    matchLabels:
      app: spring # 选择哪个Pod
  template:
    metadata:
      labels:
        app: spring # 为这个Pod打上标签,方便控制器管理
    spec:
      containers:
      - image: registry.cn-hangzhou.aliyuncs.com/k8s-dc/spring:1.0 # 远程镜像名
        name: spring
创建Deployment:
kubectl apply -f deployment.yaml
查看
Deployment和Pod:
kubectl get deploy,pod

创建
service.yaml文件,内容如下
apiVersion: v1
kind: Service
metadata:
  labels:
    app: spring
  name: svc
spec:
  ports:
  - port: 8080 # service的端口
    protocol: TCP
    targetPort: 8080  # Pod端口
    nodePort: 30091 # 外部访问端口
  selector:
    app: spring
  type: NodePort
创建Service:
kubectl apply -f service.yaml
查看Service:
kubectl get service

访问
完成部署!


开源、云原生的融合云平台
更多推荐
 11
11 0
0- 0


 已为社区贡献1条内容

所有评论(0)